You might be familiar with the use of red or purple coloured leaves or flowers as a test for pH – I used red cabbage leaves in the soil medium pH experiments for the post Water hardness, pH and bonsai. The pigments in these leaves and flowers (usually anthocyanins – read more about them here) respond to pH by changing colour quite predictably. But how leaves or petals behave in a dish with acid or alkali bears no relation to how they develop as organs of the plant.
I came into this post with the hypothesis that pH would not affect flower colour. The internal environment of all cells – including those of plants – is actively regulated and buffered to avoid variation – a process known as homeostasis. Cells need to maintain a stable internal environment for the biochemical reactions of life to operate effectively. Key cellular attributes like temperature, pH, salinity, glucose levels, metals and other nutrients are carefully balanced, and cells have specific mechanisms to adjust these up and down within a band of tolerance. So adding acid or alkili to a plant’s growing medium doesn’t make their cells more or less acidic, and if that doesn’t happen then it wasn’t clear to me how the pigments in the cell vacuoles could react with anything to change colour.
But it turns out that what can end up changing a plant’s flower colour is the presence of metal ions. If you’ve read my post on nutrients, or probably even if you haven’t, you’ll know that a certain amount of trace metals are necessary for biologically essential processes, many of which include metal ions in the relevant enzymes (like RuBisCO which has a Magnesium ion and is a crucial enzyme in photosynthesis). Plants need these metals, but overdoses of essential elements negatively affect plant metabolism, so they have evolved mechanisms to handle excess amounts.
One of these mechanisms is chelation. Chelation is when a metal ion reacts with another molecule to form a complex, taking the metal out of its reactive, ionic state. Metal ions chelate with pigment molecules in plants such as anthocyanins and flavonoids, creating compounds known as metalloanthocyanins, or metal-flavonoids. The formation of these compounds shifts the colour spectrum previously displayed by the pigment.
A variety of metal ions have been shown to form these complexes, including aluminium (Al3+), iron (Fe3+), magnesium (Mg2+), and calcium (Ca2+). Laboratory studies have also shown that other ions, such as cobalt (Co3+), manganese (Mn2+), zinc (Zn2+), and cadmium (Cd2+), can produce various colours when chelated with anthocyanins.
The key relationship with pH is that these positively charged metal ions are more bioavailable to plants in acidic soils. This means in acid soil more positively charged metal ions (if present) are taken up into the plant, when excess amounts are dealt with through chelation with pigment molecules.
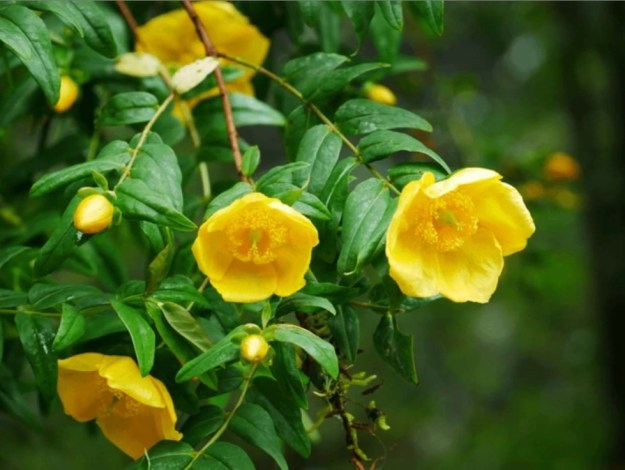
Some examples are (left to right below), Hydrangea (goes blue with Aluminium in an acidic environment), Camelliajaponica (some cultivars produce purple flowers through Aluminium chelation), Camellia chrysantha (deep yellow colour comes from Aluminium chelation with quercetin flavonoids), and Centaurea cyanus (Cornflower) which requires Iron and Magnesium for its blue colour, as do Petunias.
The addition of magnesium has been shown to increase the content of anthocyanins and enrich the flower colours of various ornamental plants including Anigozanthos flavidus (red flowers), Limonium sinuatum (blue bracts), Gypsophila elegans (pink flowers) and Aconitum carmichaelii (blue flowers). Magnesium supplementation in grapevines has also been observed to brighten grape colour.
Obviously not many of these are common bonsai species. In theory, based on the information in this post, trees with pink flowers such as hawthorn, azalea, cherry and even the leaves of Japanese Maples could operate on similar principles. Azaleas and Japanese Maples are thought to be less vigorous and colourful in alkaline soils, but I haven’t found any evidence linking this specifically to metal chelation. So for sure if you have a Hydrangea bonsai then this will change colours based on pH – and the presence of Aluminium. But for the rest there isn’t any evidence for or against. If anyone would like to do some experiments and share their results, please get in touch.
Editor’s note: for the first time I used Google Deep Research to assist with writing this article. As a result the references don’t line up to exact sentences like in my other posts. I’m not sure I like this, and may change my approach for future posts, but in the meantime below are the references which were relevant to the content I ended up using.
May is pine pollen time at Kew Gardens and today I spent a fun hour or so taking pictures of different pine species and their pollen cones (and a few non-Pinus ring-ins). For the extreme pine nerds among you!
Pinus contorta / Lodgepole pinePinus echinata / Short-leaf pinePinus bungeana / Lacebark pine Pinus attenuata / Knobcone pinePinus pinaster / Maritime pinePinus ponderosaPinus ayacahuite / Mexican white pine Pinus nigra / Austrian pinePinus patula / Mexican weeping pinePinus parviflora / Japanese white PinePinus sylvestris / Scot’s pine Pinus pinea / Stone pinePinus mugo / Mountain pinePinus yunnanensis / Yunnan pinePinus muricata / Bishop pineNow a diversion away from Pinus, this is Prumnopitys andina / Chilean plum yew (Podocarpaceae)Cunninghamia lanceolata, Chinese fir (Cupressaceae)Sciadopitys verticillata / Japanese umbrella pine (Sciadopityaceae)
What is a bract? A bract is a part of a plant with which many people are quite unfamiliar. Did you know that all of the below images show bracts? The petal-like structures in the first six images are actually bracts, and in the last three which show conifer cones, the spiky/protruding parts are bracts.
PoinsettiaBougainvilleaHop flower/coneDove or Handkerchief Tree (Davidia Involucrata)Dogwood (Cornus)BananaDouglas FirAbies bracteataLarix kaempferi
According to my Shorter Oxford English Dictionary volume 1, ‘bract’ is a botanical term which describes a ‘leaf or scale, usually small, growing below the calyx of a plant’. In other places a bract is defined as a ‘modified leaf’.ref In angiosperms (flowering plants), it is part of an ‘inflorescence’ which is the entire flower head, including the stem, stalk, bract and the actual flower.ref In gymnosperms (conifers), bracts can be found on/in cones.
So a bract in reality is its own separate type of plant organ, and not a petal or a leaf. It plays its own role in supporting the plant’s development, which can be wide and varied depending on the species. Different studies have identified bracts to be responsible for protecting the flower from herbivoryref as well as the weatherref, for producing defensive compounds which kill insectsref, for flowering (or not)ref and for attracting pollinators.ref One study found that the presence of bracts is determined by the IFY gene, which either allows a bract to form, or recruits the cells which would have been used for the bract into the flower instead.ref
So what is the relevance for bonsai? Well, bracts are part and parcel of any flowers or cones that you have on your bonsai tree and they develop only once, as part of the inflorescence, or cone. This means that like flowers, fruit and cones, they cannot be reduced in size* in the same way that leaves can, because reducing leaf size is usually done by pruning or defoliation. If you remove the inflorescence or cone, you’ll need to wait until the plant regenerates a whole new reproductive organ and it likely won’t be reduced in size.
This needs to be considered if you want to bonsai a Cornus, a Davidia involucrata or a Bougainvillea. Varieties with naturally smaller bracts are preferable for bonsai, just like varieties with smaller fruit are better. Poinsettia are never going to make good bonsai, even though in their native Mexico they grow up to 3m tall.ref But a species with smaller bracts, such as a hop hornbeam (Ostrya carpinifolia), lime/linden and hornbeam, can be very pretty. In these species you need the tree to be at the reproductive phase in order to produce inflorescences (which include the bracts).
Hop hornbeam (Ostrya carpninifolia)Hornbeam (Carpinus)Linden (Tilia)
* This isn’t strictly true as there are a number of actions which can reduce the size of flowers & fruit, such as underwatering, and leaving as many fruit on the tree as possible, but that’s a topic for a different post.ref
It’s probably obvious that many plants, like humans, go through different developmental phases throughout their lifetimes. In plant biology, a developmental phase describes a period of time during which a stem produces a specific type or combination of organs, such as shoots & leaves (vegetative organs) or flowers & cones (reproductive organs). In fact for plants it is individual stems, not entire plants, which go through these phases and so a single plant can have stems which each are in a different phase.ref
All trees start in a vegetative phase – the initial growth phase when the tree is establishing. Usually this means that only foliage is produced, and no cones, flowers or fruit – in fact the growing tip is not capable of producing flowers during this phase. The vegetative phase can have stages within it, for example juvenile foliage may be produced before adult foliage, however in vegetative phases, stems are programmed genetically to produce only shoots and leaves. Although we often refer to defined ‘juvenile’ and ‘adult’ foliage in trees, it is apparently a bit more complicated, with variation within the phases as well. In fact many different attributes are affected by the stem’s phase, including the size and shape of leaves (as seen in conifer needle and scale foliage), phyllotaxy (the arrangement of the leaves), plastochron (the time between leaf primordia emerging), internode length, adventitious root production, trichome distribution and cell size.ref These are all – as you have probably worked out – genetically controlled, apparently by ‘microRNAs’ref, specifically miR156 and miR172 as shown below.
A phase change is when a stem starts producing a different type of organ from its growing tip (meristem). For example, it starts to produce buds which will become flowers. Phases changes are usually – but not always – stable – that is they don’t tend to move in reverse order. Once a tree has reached the reproductive phase on a particular stem, it should retain that capability since the meristem has changed to the new phase. As an illustration of this is that when propagating cuttings and air layers, once they are successfully rooted, the stem will maintain the properties it had on the tree (until that stem goes through the next phase change). If it had flowers before, it will continue to flower. In some species – particularly conifers – if the stem was horizontally oriented it will continue to grow horizontally.ref
One good example of phase differences on a tree is suckers. Suckers are shoots which emerge from the base of a tree, and as they are derived from buds which have not passed through the same growth process as the rest of the tree, they are usually juvenile vegetative shoots, even if the main branches of the tree have reached a flowering phase.
One study found a logical sequence of developmental phases based on biochemical factors which turned on certain genes.ref They found that substances which are important for embryo development in the seed promote the initial vegetative phase. It’s then sugars – the product of photosynthesis – which contribute to an ‘adult’ vegetative phase change. So continued photosynthesis and the production of more sugars over time, promote phase change. Plant growth regulators (aka phytohormones) also play a role, with Gibberellin A3 shown to revert ivy back to juvenile foliageref, although the exact interplay with auxins and other substances is still not clear as of 2020.ref A key finding from this study was that defoliation delays vegetative phase change – so don’t defoliate or prune if you’re trying to develop mature foliage!
When a stem moves into a reproductive phase, the structure of the growing tip changes so that floral organs (which become flowers) are produced instead of shoots & leaves. In woody perennials (ie. trees) which have reached the reproductive phase, stems can transition between vegetative and reproductive, allowing them to continue to grow, as well as reproduce.ref For example, they may produce vegetative buds at the start of the new stem, reproductive buds in the middle and more vegetative buds at the end.ref This is all regulated by genes. One study on poplar identified two genes which control this transition based on environmental conditions – illustrated in the diagram below. The gene FLOWERING LOCUS T1 drives reproductive onset – in experiments, FT1 caused vegetative meristems to transition to reproductive when it was expressed in response to winter temperatures. As a result, the organs developing inside the winter bud moved from vegetative (formed earlier) to reproductive (formed later when it was colder). This created a bud with both forms of stem waiting to emerge in spring. Its partner gene FLOWERING LOCUS T2 then took over during warmer weather and drove vegetative growth.
If you are working with material which has not yet flowered, you would probably like to know how long it will be before it does, and what you can do to encourage your tree to flower. This is where horticulturalists use the concept of ‘growing degree days’. Growing degree days is a measure of the amount of heat that a plant has received over its lifetime (this would also be associated with the amount of light, which as we read above drives sugar development which in turn encourages phase change). Growing degree days (“GDD”) are used when planning crops and flowering annuals & perennials. They are calculated as follows:
GDD = t (days) x ( (TMAX+TMIN)/2 −TBASE)) ; where TMAX and TMIN are daily maximum and minimum air temperature, and TBASE is a known baseline temperature.
For example, I have recently been trying to grow the Australian plant Sturt’s Desert Pea (Swainsona formosa). Studies have shown that this species requires 874 GDD for 100% of axillary branches to flower and 988 GDD for 100% of main stems to flower.ref This is an extremely high light and temperature requirement for what is effectively an annual, so I have a heat lamp (and a grow lamp) providing daytime temperatures of 28oC and evening temperatures of 18oC. The base temperature for the calculation is 5oC.
So the number of days theoretically required to achieve 100% flowering on axillary stems using my setup will be a minimum of 874 / ((28 + 18)/2 – 5)) = 874 / 18 = 49 days.
You can see that if this relationship is true then global warming will shorten the flowering time of plants since plants will achieve their GDD faster. And this is what has been observed; in the UK researchers found that plants are flowering a month earlier due to climate change.ref
For trees which have to first achieve reproductive maturity, then generate floral organs, it’s likely that both growing degree days and other environmental accumulations (such as a cold period known as vernalisation, light levels and total rainfall) are involved.ref The key point is that these are accumulations of the factor in question, which implies that time is needed, as well as the correct conditions.
What does this all mean for bonsai?
Firstly if you are obtaining material for bonsai, consider what type of phase you want for the tree. If you want a flowering tree straight away, you need to take a cutting or air layer from a stem which has reached the reproductive phase. A sucker, or seed, will start from scratch right at the beginning of the tree’s development – and depending on the species it may never flower or fruit the entire time that you own it! As has been noted elsewhere in this blog, if you have a tree with juvenile foliage and you keep pruning it back, it may never reach an adult foliage or reproductive phase, because it may not have accumulated the amount of sugar or growing degree days to move to that phase. So when sourcing a new tree, if you want fruit or flowers you should make sure that it has produced these already.
Also, the environmental conditions which your tree is naturally used to are important for its phase transitions. Using the above example, if you put a poplar indoors where it never gets the cold temperature signal to activate FT1, it won’t create flowers or seeds. When you have a non-native tree in your collection, it’s a good idea to research its usual climate and to try to replicate it as much as possible.
I live in London, a city sitting on a giant chalk deposit which formed in the Cretaceous period and stretches all the way to France (via the Eurotunnel)ref Chalk is a form of limestone made up of the shells of marine organisms, and is comprised mostly of Calcium Carbonate (CaCO₃).ref According to my water supplier (Thames Water) “When your drinking water seeps through this rock, it collects traces of minerals like magnesium, calcium and potassium. This is what makes it hard.”ref
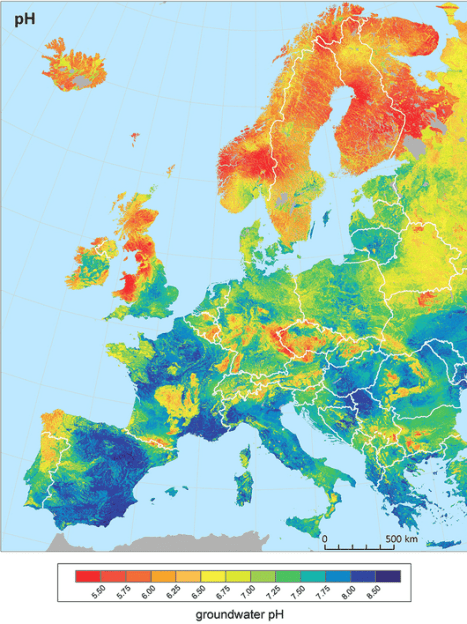
As you can see the water in my area is towards the harder end of hard. But there are plenty of places in Europe with hard water as well, as you can see in this map which comes from a study measuring groundwater in 7,577 sites across the region – most areas in fact are hard with exceptions in Scandinavia, Scotland and northwestern Spain (where igneous/volcanic bedrock dominates)ref:
What is also interesting from this research paper is the corresponding map of groundwater pH (see below). Groundwater pH determines your tap water pH if that’s where your drinking water comes from. Some areas source their drinking water from surface water as well, such as lakes and running watercourses – for example in Sweden it’s 50/50.ref
pH is closely associated with water hardness, with higher levels of calcium carbonate leading to increased pH (in the world of agriculture a common practice to raise the pH of acidic soils is ‘liming’ – or adding calcium carbonate)ref. Look at the areas in Southern Spain and France below which are pH 8 and above – their groundwater is also hard as shown in the map above.
The water in my taps is pH 7.75, so getting close to 8 which is relatively high. Not only that, but continued watering and drying of a bonsai medium with calcium-carbonate-rich water could increase the concentration of calcium carbonate in the pot and potentially make the pH even higher. But is this a bad thing?
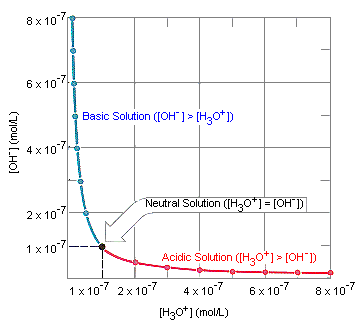
To answer that question we need to take a detour into pH and what it actually means. At this point you can be thankful that usually I wait for a couple of days before posting, because otherwise you’d be deep in the weeds of ions, acids & bases and cursing my lack of editing skills! The (relatively) simple version is that pH is a measure of the concentration of hydronium (H3O+) ions relative to hydroxide (OH–) ions in water. In a neutral solution like pure water, they are at equilibrium and there is the same amount of each. The chart below shows the different ratios of hydronium to hydroxide ions at each pH. You will notice that in the red section there are more hydronium than hydroxide – this is acidic. In the blue section there are more hydroxide and less hydronium – this is alkaline (aka basic).
pH is mainly a useful way of describing a chemical environment, as it helps to explain how other chemicals will react in that environment. For example, when a low pH (acidic) solution reacts with many metals, hydrogen gas and a metal salt are created.
pH is one of the fundamental attributes that affects living things – including plants. In living cells a difference in pH across the cell membrane is harnessed to drive some of the most fundamental processes for life itself – photosynthesis and respiration.ref1,ref2 Living things are generally very good at managing the pH inside their cells and have feedback processes to adjust it up or down according to their needs and the environment (called homeostasis). Studies have shown that pH within plant cells is maintained at a small range of 7.1–7.5.ref
It’s when plant cells interface with the outside world, such as when taking in nutrients from the soil, that pH can make a difference to the efficiency (or not) of these reactions. Nutrients are taken up by plants as ions – ie. dissolved in water. This means that they need to be in solution for root hairs to take them up, and that solution can be acidic, alkaline or neutral.
Dissolved substances in the soil water (which change its pH) can also change the availability of nutrients – for example calcium ions will react with phosphorus ions to make calcium phosphate, so the phosphorus is unavailable for plants.ref But plants adjust their uptake according to these changes, so when they detect pH levels which reduce nutrient availability, in many cases they adjust their uptake to compensate, and these forces work in opposite directions.ref The overall effects of pH on the availability of nutrients to plants are a combination of the effects of pH on absorption by soils and the effects of pH on plant uptake.
Below is a chart showing the absorption of different nutrients by soil (in this case geothite, an iron rich soil). You can see that due to their different chemical makeup, each nutrient has a different absorption rate – the higher the absorption, the less available for plants.
Negatively charged metals (‘anions’) have a more consistent soil absorption profile – and most are absorbed by the soil eventually when the pH is 6 or above. But uptake by plants is significantly increased as pH rises.
So far it seems like acidic soils might provide more nutrients – but also more toxins (eg. cadmium, lead & aluminium). But the release of organic matter, including nitrogen, sulphur and the activity of microbes which perform this breakdown, is increased at higher pH, and the uptake of metals is increased.ref So it’s really a conundrum to work out the net effect of all these interactions! What do we actually know? Some findings include:ref
Phosphate fertiliser is least effective near pH 7; it is necessary to apply more of it to achieve the same yield as at lower pH. It is most effective near pH 5
Boron uptake is consistent between pH 4.7 and pH 6.3, but a 2.5-fold decrease occurs at pH 7.4
Molybdenum uptake is eight time higher at pH 6.6 compared to pH <4.5ref
Uptake of metal ions from solution by plants is increased by increasing pH – but their availability is decreased. This applies to toxins as well as nutrients. Magnesium and potassium are two important nutrients to which this applies.
Sulphate’s absorption by soil decreases markedly with increasing pH but plant uptake also decreases – the net effect has not been determined.
There is actually a fantastic diagram which shows the best soil pH range for each plant nutrient – you can see this all over the internet and it looks so useful! But unfortunately this diagram, which was created in the 1940s, is incorrect and has no real numbers behind it.ref In reality “nutrients interact and different plants respond differently to a change in pH” as described above so there is no one-size-fits-all diagram.ref
While I’m in mythbusting mode, there isn’t any such thing as ‘soil pH’ either! As noted in this excellent study from March 2023, pH can only be measured in a liquid. Unless you are over-watering, it’s likely your soil is not a liquid, therefore the soil itself does not have a pH. The pH that is being measured when ‘soil pH’ is measured is actually the pH when the soil is mixed with water – whilst this is indicative of the pH that might be present on individual soil particles, there is probably a range of pH instead across different particles. The pH of the water on a soil particle and the pH of the water on a root hair combine to create the true pH environment for a particular nutrient on a particular root. This is obviously not very easy to measure! See the end of this article for my bonsai media pH experiment.
The study mentioned above basically claims that most studies on pH and soils have failed to take into account the interplay between availability in the soil and plant uptake of a nutrient, which often work in opposite directions and so pH should not be taken to be the main factor in nutrient uptake except in specific circumstances. But looking at all of the above, it does seem like slightly acidic conditions should optimise all of the different reactions taking place – between 6 and 7 pH.
To bring it back to my bonsai, in my London garden with hard tap water of pH near 8, on the surface it would appear that this has the potential to cause a phosphorus deficiency in my plants, and perhaps affect their boron, molybdenum and metallic ion levels (we care about magnesium particularly which is used for photosynthesis – magnesium uptake increases at high pH but availability in the soil decreases).
But tap water is not the only thing affecting pH in the water in my bonsai soil. It’s also affected by the pH of my rainwater, which was 5.89 on the last measurementref, as well as the medium in my pots. I use composted bark, biochar and molar clay. Composted bark has organic components so is acidic, biochar is slightly alkaline and molar clay appears to be acidic – and this pH will become evident when particles of these components dissolve into the water. So the actual pH of the solution in my bonsai soil is anyone’s guess! All I can conclude from this is that a long summer without rain might cause my soil to increase in pH due to the removal of one acidic component – the rainwater.
The other thing to consider is that you can obviously adjust the availability of nutrients by adding them to your soil. So even if uptake is reduced by a particular pH, making more nutrients available could compensate for this. Hence the importance of regular fertilising for our bonsai, and using a range of different fertilisers which provide different nutrients.
Finally if you want to test the pH of your bonsai medium, a good approximation can be made by using a red cabbage and some distilled water (don’t use tap water, as this will affect the outcome if it’s not neutral to start with). Simply boil up a bit of red cabbage in (distilled) water, let it cool and while you are doing that put a representative piece of your bonsai medium into some water (also distilled). Allow them to soak for a while. Remove the cabbage from the cabbage water, strain the medium out of the bonsai medium water, and pour some of the cabbage water into the bonsai medium water. It should change colour according to the pH as follows (you can read more instructions here):
I performed this experiment on different bonsai mediums I had sitting around in my shed by soaking them in filtered water for 1 hour, then adding the cabbage indicator. The results were interesting! I was expecting the Kanuma to be acidic but it was actually neutral, as was my bonsai mix (which included some molar clay, bark, biochar, pumice and compost), and the pumice was surprisingly slightly alkaline. A rather small amount of biochar caused the indicator to go dark blue, which definitely tells me it needs to be used in moderation (although other mechanisms in biochar make nutrients available to plants, which you can read about in my biochar post).
What I conclude from all this is that my use of composted pine bark in my bonsai mix is probably a good thing as it will counteract the alkalinity from the tap water. This was a suggestion I learned from Harry Harrington’s website – although he recommends it for water retention, it would appear to balance a high pH medium or water as well. It also has the added benefit of being organic matter, which is a fertiliser in itself, creating more nutrient availability even if the calcium carbonate in my water locks some away. The need for applying fertiliser regularly is also apparent, as you just don’t know how nutrients are behaving in your particular bonsai soil and you need to give each tree every chance they have to access the nutrients they need. But overall other than causing annoying limescale marks on pots, my bonsai seem completely fine with hard water.
You’ve probably heard the term ‘nitrogen-fixing’ – it means extracting nitrogen from the air. Which doesn’t seem like it should be too difficult, since nitrogen makes up 78% of airref, but in reality plants can’t use gaseous nitrogen.
In nature (ie. where nitrogen is not added artificially as fertiliser) plants mostly rely on microorganisms to help them get nitrogen – they access it in dissolved inorganic forms as ammonium (NH4+) and nitrate (NO3-). This is the nitrogen cycle, where organic nitrogen from dead organic matter is converted back to inorganic nitrogen as ammonia (NH3), then ammonium, then nitrate.ref Although this is performed by a range of different bacteria and fungi, this is NOT nitrogen-fixing, it’s ammonification followed by nitrification.
Nitrogen-fixing is the specific act of extracting nitrogen from the air, and it’s also performed by a range of different bacteria, known as diazotrophic bacteria. Certain plants create symbiotic relationships with these bacteria, with the most effective being root nodule symbiosis. These plants have evolved to provide a safe home for nitrogen-fixing bacteria in their roots, in small nodules where the bacteria live. The bacteria get food from the plant and protection from the outside world, and in return the plant gets nitrogen. Plants which can do this all belong to the ‘FaFaCuRo’ group – Fabales, Fagales, Curcubitales, and Rosales – they are all flowering plants (angiosperms).ref You can download a database of all 825 known species with root symbiotic nitrogen fixation here – they include green manure such as clover and legumes, as well as some trees – Acacia (wattle), Casuarina (sheoak), Albizia (Persian silk tree), Robinia (locust), Wisteria, Alnus (alder), Elaeagnus (oleaster) and Hippophae (sea buckthorn).
The initial question behind this article was me wondering whether planting clover or similar nitrogen-fixing plants in my bonsai pots would achieve anything – like somehow supplying my tree with a free source of nitrogen. After looking into it further I concluded that the answer is no! Nitrogen-fixing plants have a great system – for themselves. The reason why they are used as green manure, or as rotational crops, is because they don’t require (or require less) supplemental nitrogen, so the land where they are planted gets a break from fertilizer. When they are harvested they can be ploughed back into the ground for bacteria to break down via ammonification/nitrification, so the next crop can benefit from a nitrogen source which hasn’t come from fertiliser. Basically it’s a way of making natural fertiliser – effectively compost – which hasn’t had added fertiliser as an input.
You could benefit from nitrogen-fixing plants such as clover for your bonsai practice – if you composted it and used it as organic matter in your soil mix. In fact it has been found that nitrogen-fixing trees in a tropical forest inhibit their neighbours (possibly due to their stronger growth rates), so you definitely don’t want your trees to share a pot with these species while they are alive.ref
There is also what’s known as ‘associative nitrogen fixation’ – this is when a nitrogen-fixing bacteria ‘associates’ with a species of plant without actually taking up home in root nodules. They are found on the roots, in the rhizosphere, and sometimes within plant tissues as endophytes.ref It has been suggested that up to 24% of nitrogen supply to cereal crops such as maize, rice and wheat is actually supplied in this way and that ‘mucilage’ (sugar exudates from roots) may be responsible for attracting the responsible bacteria.ref Although interestingly it may not actually be that the bacteria provide nitrogen directly, but instead they influence the plant to be able to access more nitrogen in the soil, for example by increasing root hair surface area.ref This is the mechanism by which biochar improves nutrient acquisition as well – by increasing the plant’s Nitrogen Use Efficiency or ‘NUE’.ref1,ref2
Which unfortunately brings us back to needing a source of nitrogen in the soil in the first place. What I have concluded is that unless a bonsai tree is a nitrogen-fixing species itself, the only way for it to obtain nitrogen is from the soil via the nitrification of dead organic matter, or by adding chemical fertiliser. And from a sustainability point of view, using at least some dead nitrogen-fixing organic matter (such as legume plants) for composting may be best as this is net-positive for nitrogen, bringing previously inaccessible air-borne nitrogen into the soil (so – go forth and compost your legumes!)
The main impact you can have as a bonsai tree custodian (aside from providing a nitrogen source) is to improve your tree’s nitrogen use efficiency so it can gain the most from the nitrogen which is present. There are a few ways to do this. Adding beneficial bacteria to the soil provides the associative nitrogen fixing effects explained above, and keeping the pot at the requisite temperature, pH, aeration and soil water level that is attractive to these microbes is also a factor – although it’s hard to know exactly what these conditions are! Avoiding extremes is probably the best approach. Adding biochar to the soil is known to improve nitrogen use efficiency.ref Encouraging a high root surface area through root pruning and encouraging root ramification is another contributor. Finally, do not overfertilise, as this has the opposite effect on root ramification since nutrients are easy to find and roots do not need to increase their surface area.ref
At a recent club meeting (shout out to Twickenham bonsai club) the subject was azaleas. During a critique session it was noted that on Satsuki azaleas, different coloured flowers appear on different branches so you need to be careful when you prune not to remove the colours you want to keep. This got me wondering about Satsuki azaleas, why they have the colours they do, and what this might mean for their bonsai custodians.
Starting from the start, flower colour is the “result of pigment molecules accumulating in cells”ref and depends on which pigment molecules are present, where they are distributed, and the shape of the host cell.ref
There are several different types of molecules responsible for colours in flowers – the main ones are carotenoids, flavonoids and alkaloids. There are 700 known naturally-occurring carotenoids,ref including substances in the carotene and lutein families like beta-carotene which is in carrots and lycopene which is in tomatoes – these produce yellows and some oranges. Flavonoids produce the widest spectrum of coloursref, and these include anthocyanins which make pink to blue-violet colours, chalcone/aurone which make deep yellows and flavones/flavonols/flavanones which make white and light yellows. Betalains don’t get as much press as the previous two pigments, but these are responsible for reds and deep purples (such as in beetroot) – and interestingly they never appear in the same place as anthocyanins, so it is either one or the other in a given flower.ref
In the case of azaleas, anthocyanins and flavonols are the major pigments.refOne study analysed azalea colours by their pigments, and showed that the different colours fit into three pigment groups – red, purple and white. They found that the red group contained two to four major anthocyanins, and the purple group had two to six – therefore more colour variation is possible in the purple group. They found also that white group flowers did not contain any anthocyanin, but did contain the precursors to this pigment, so their lack of colour is probably a genetic defect in the pigment biosynthesis pathway which causes pigment creation to fail.
D. Mizuta et al. / Scientia Horticulturae 122 (2009) 594–602
Pigment molecules are what are known as ‘secondary metabolites’ in plants – substances which they synthesise to help them in some way or other.ref Aside from those mentioned above, chlorophyll is another pigment that plants make, this appears green and is responsible for photosynthesis. Without going into the detail of the chemical structure of each pigment, the key point for this article is that plant cells need to synthesise a pigment or usually a combination of pigments in order to display a particular colour. The synthesis of pigments is a multi-stage process which is mediated by enzymes, and the production of enzymes is under genetic control (see a cute animation of this here). So genes – contained in the DNA within chromosomes in every cell – determine what pigments are produced where when cells develop. To learn more about the biosynthesis pathway for azalea pigments you can read this paper (a reasonable understanding of genetics is needed to make sense of it). This seems like a good moment to state that I am not a geneticist! So the below is my citizen-scientist interpretation of what I have read – if there are errors I would be happy to correct them.
The most obvious phenomenon illustrated in these examples is that each plant develops flowers of different colours and patterns. Some flowers are one colour (red), some another (white), some have different coloured petals, some have coloured stripes and others have speckled colours. Not shown here are the different flower shapes, which can also be different on the same plant. Each one of these ‘phenotypes’ (observable traits) has its own explanation.
The ability of a single plant to produce different phenotypes for flowers is known as ‘sporting’ and the branches which have this variation from the ‘base’ colouring are known as ‘sports’. Sports result from “sudden variations in gene expression of somatic cells…[which]…results in plants having a different phenotype” – in plain English this means that one or more cells which produce a shoot or flower bud all of a sudden start to use different instructions for creating pigments.ref According to an excellent South African study by S de Schepper et al, which I have used extensively in writing this post, “all the information required to sport (the ‘sporting capacity signal’?) is present in leaves”, which suggests the capacity for sporting is across the tree – it’s a characteristic possessed by the plant as a whole, which is triggered in a specific cell as a ‘sporting event’.
How a sporting event happens is that the meristem (the growing tip of the plant) spontaneously develops a mutation in a cell, and every cell that divides from this cell carries the same mutation. The South African researchers investigated this for azaleasref and found that the majority of these changes in azaleas are ‘epigenetic’ events such as those caused by ‘transposons’ or so-called ‘jumping genes’ref. These types of sports can only be passed on to new plants by clonal propagation, since epigenetic events are by definition not captured in seed or pollen.
But what is clearly passed on genetically is the ability to produce sports in the first place, this is obvious by the fact that so many Satsuki azalea varieties which are created by sexual reproduction have sporting behaviour. Probably the best hypothesis I have come across to explain this is that polyploid parent plants are partly responsible. Mark Nijland notes in an article in 2022 that ‘Suisen’ is a dominant parent plant in Satsuki breeding.ref It turns out that ‘Suisen’ is not only a tetraploid (ie. it has four sets of chromosomes instead of the normal two), it’s also a mixaploid, which means it has different genotypes in different parts of the meristem – some areas are diploid (with two sets of chromosomes) and some are tetraploid (four sets of chromosomes).ref Other tetraploid/mixaploids include ‘Shinsen’, ‘Miharu’ and ‘Koyo’ and there are also a number of known Satsuki azalea triploids (having three sets of chromosomes).ref What polyploidy/mixaploidy brings to the plant is a larger number of options (known in genetics as ‘alleles’) for development – so that when a flower is created it can have multiple different colour or pattern options.
Another factor is that polyploid organisms have to deal with what is called ‘genomic shock’. When more than two sets of chromosomes are combined in a single cell there is more potential for abnormal development, which can negatively affect an organism’s chances of survival. Plants are known to use transposons to adjust their genes to avoid this genomic shock.ref (This is usually the moment in a research paper or article where the author calls out the remarkable Barbara McClintock for her discovery of transposons, she also proposed the idea of genetic shock. She presented her work at a symposium in 1951 to great derision and wasn’t believed for over a decade – her Nobel Prize wasn’t awarded until 1983.)
Anyway, transposons jump into a gene and change its function – switch it on or off or cause it to do something different. Due to managing genetic shock a polyploid plant is more likely to be making use of transposons than a genetically stable diploid (the ‘normal’ two sets of chromosomes) plant.
The theory goes that in Satsuki azaleas, the presence of polyploidy and mixaploidy result in plants which are more likely to spontaneously adjust their genetic expression via transposons, and when this happens, a wider range of colour and form options are available due to the larger set of genetic material from which to choose.
A prevalence of polyploid/mixaploid parents would undoubtedly be down to selection by Japanese breeders over the centuries. Azaleas have been intensively hybridised and selected since the 1600s, and in 2020 there were 1400 varieties listed in the Japanese Satsuki dictionary.ref The polyploid parents such as ‘Suisen’ must have been observed to produce sporting child plants over the long term, and were retained for breeding (this article notes that Suisen is the most dominant parent over three decades of cultivar production). It has been found by genome analysis that not only did the ancestor of azaleas have a whole genome duplication event 75 million years ago, but also that the genome of Rhododendron simsii, a parallel branch of rhododendron to Satsuki azaleas (which are mainly Rhododendron indicum) is 47.48% comprised of repeat elements, the majority of which are transposable elements (transposons).ref So it’s not surprising that somewhere along the way azalea breeders came across varieties which dialled up the ‘sporting’ aspect of their genetic makeup.
Let’s take a look at some of the different types of sports which are observed on Satsuki azaleas and why they form. First we need to understand one key attribute of sporting events which took me several days to get my head around – once you do it is a bit of an ‘a-ha!’ moment. This key insight is that sporting events can happen anywhere on the meristem – for example half-way up a shoot as the meristem is happily dividing – they don’t necessarily neatly happen just as a flower or shoot bud is emerging. Wherever a cell is dividing and generating a new cell, a sporting event can take place. If a sporting event related to flower pigment happens halfway up a shoot, you won’t notice it until a flower emerges but that sport will be there on the stem and on any leaves which bud from that stem. So to understand how flowers on a stem might be affected by sporting events you need to imagine the time-sequence of your azalea developing and how a sporting event would propagate along a stem as the plant grows.
Different but uniform colours on each flower occur when a sporting event changes the gene expression for pigments across the entire flower – so all cells are affected. For example, a pigment isn’t expressed any more, or a pigment which was suppressed is now expressed. It is said that darker colours in azaleas dominate geneticallyref. So in the image above, the ‘cancel pigment’ genetic defect was already present in the tree – to produce white flowers. As the tree grew and new stems developed, some transposons jumped into the defect in a cell which was a precursor to an entire stem or branch, and deactivated it. From then on the flowers would be red due to the red pigment being produced. Some branches haven’t had the transposons jump yet, so they stay white.
Stripes are caused by ‘genetic mosaics’ or chimeras where different cell layers or areas of cells within the meristem have different genotypes. So part of the stem where this flower bud developed has the sport and part does not – and both of those sets of cells contributed to this flower. In the example above you can see a flower with a clearly delineated section of dark pink on the left. This is an indication that the sporting event (in this case reactivating the pigment production) happened at a point which you can trace back along the two edges of pink. These flowers may be relatively solitary on the tree, since it’s their unique position and timing of development which gives them these patterns. You can imagine a small stripe of pink along the stem where this flower bud came from, back to the location of the sporting event, and one might continue along the stem above this flower as well.
Flecks are another version of chimeras but the mutation is not persistent in the same way as stripes – you could call them ‘micro-sports’. One explanation for this behaviour could be that the transposon which reactivated the red pigmentation ‘flickered’ on and off as the flower developed. Unlike stripe chimeras, flecks can be passed down to child plants, indicating that ‘flickering’ behaviour is a genetic trait and not an ephemeral one like most other sports.ref
Petal borders or margins of a different colour on the same flower (also known as picotees) can arise in different ways. In flowers with large margins (7mm or more) this is due to different cell lines being mixaploid, resulting in the petal edges containing 4 sets of chromosomes and the rest of the flower containing 2 sets of chromosomes. In one study this made petal edges white and the centre red as in the picture above.ref Other picotees are caused by ‘positional’ differences in gene expression where all cells have the genes necessary to make pigments, but only those in a specific position are ‘instructed’ to do so.ref In both cases these are due to somatic/spontaneous changes and cannot be passed down through sexual reproduction.ref
Combinations of effects are seen on many Satsuki azalea varieties – the one above has stripes, picotees, flecks and three different colours – intense pink, mid-pink and white. Having all these effects together comes down to the mastery of the breeder, in combining the right parents.
Effectively Satsuki azaleas are like giant 4-dimensional genetic puzzles, with gene switching happening all over the plant at different moments in time to create a completely unique plant! No wonder people get obsessed with them. So finally, if you’ve reached this far through my total geekfest immersion into Satsuki azaleas and their genetics, what does it mean for bonsai?
Well, hopefully the above will help you understand that ‘sporting events’ or spontaneous mutations are what cause many of the different flower colours and patterns seen on Satsukis. And that the type and duration of the sporting event will determine what colour/pattern change happens upstream. You might also be able to work out roughly where these events have taken place on the plant which will allow you to trace where they will go in the future and to either encourage that growth or prune it away, depending on your goal. This information might also help you choose the right variety if you’re buying a Satsuki azalea – especially if you want lots of variation, choose a polyploid/mixaploid or one of its children.
A final question I had for this article was if there was any way to increase epigenetic events to generate more variation on the plant and increase sporting. The answer is yes. “Stresses such as wounding, pruning, viral infection, and tissue culture are all known to induce the movement and/or activity of Transposable Elements, as well as DNA damage”ref One relevant stress in our case is pruning. Pruning back hard (as is advocated by azalea specialists such as Peter Warren of Surayama Bonsai) should generate variation since it creates lots of new growth (ie. cell division and opportunities for mutation) as well as a certain level of stress. DNA damage is another one, which can be caused by exposure to ultraviolet light.ref So in theory keeping your azaleas in full sunshine could also encourage sports. However note that as mentioned above pruning back hard might have the effect of removing a sport! If you have a really excellent sport, make sure to note where it is to avoid removing it.
I want to mention one other resource I used for this article – there is a BonsaiNut member – Harunobu – who although not recently active appears to have excellent understanding of the genetics of Satsuki. Some of their advice I found interesting although I could not verify it through other means.
Aside from confirming the theories above about transposons causing sports, Harunobu says that in azaleas “colour is dominant over whiteness, intense colour is dominant over paleness, purple is dominant over red, and solid coloured flowers are dominant over bicolour/variegated flowers”.ref This means that over time, as the meristem expands and divides, the dominant colours or regions may start to – well – dominate. That implies that assuming you like the less dominant characteristics, you should cultivate them as much as possible and not remove or dilute them. Similarly the more dominant characteristics should be pruned back to avoid them taking over all the subsequent growth. Of course – a new sport can arise spontaneously anyway to give you something new to work with.
Another comment from Harunobu was “a tip that might be marginally useful for when you are trying to ID an azalea by flower colour when it is not actually in flower. If the old leaves go yellow: it is white flowering. If the old leaves go orange; it is pink. If they go red; it is red or purple. And if they have sectors on the leaves, they have sectors on the flowers.”ref I assume this is because the pigmentation in the flowers also carries through to the leaves and when the chlorophyll dies away the pigments become visible. Theoretically you might be able to use this to visualise sports on a plant without it being in flower. However when I tried this on two of my own Satsuki, I could not see sectors (stripes) on the leaves, and all the old leaves were yellow although the trees are mainly pink. So – see if this works for you.
A weird idea I came across researching this article was the idea that somehow dominant characteristics could ‘take over’ a plant and actually influence branches which previously had been different colours or patterns. I don’t see how characteristics can literally go backwards and influence cells which are behind them in the developmental sequence. And surely new sports would appear? I can’t explain this idea and don’t think it’s true (however, I am open to being wrong). The only way I can see for this to happen is if you don’t prune at all and let everything grow out, then maybe it might be the case that the dominant characteristics take over all of the new growth.
Spring has sprung (finally) in the UK and now is the time that many trees flower, so they can pollinate the next generation with enough time for seeds to develop before winter. Plant reproduction is quite a complicated multi-stage process, but for the purposes of this post it’s enough to know that pollen is the vehicle for the male gamete (the plant equivalent of sperm). It is produced by anthers in angiosperms (flowering plants) and by male cones in gymnosperms (including conifers).
It turns out that pollen production can happen in different places. In some trees, both male and female parts are within the same flower (known as ‘perfect’ or ‘complete’ flowers). In others, they are separate flowers or cones on different parts of the same branch, shoot or tree – known as monoecious trees. In yet others they are separate flowers or cones on single-sex trees – known as dioecious.ref
Whilst female flowers/cones and the fruit associated with them are usually obvious, the pollen-bearing male flowers/cones are often hard to spot and sometimes people don’t even realise they are there (it was only about 2 years ago that I realised that oak trees even had flowers!). After releasing their pollen, male reproductive parts usually drop off and disappear from view, while the female flower/fruit/cone persists as the seeds develop. So it’s definitely worth appreciating male tree flowers when you see them, as they don’t hang around for long.
In angiosperms, many male tree flowers take the form of catkins. A catkin is an “elongated cluster of single-sex flowers bearing scaly bracts and usually lacking petals.”ref Male catkins appear on oak, chestnut, alder, birch, hazel, poplar, aspen, hornbeam, walnut and willow – a good overview of these is on the UK Tree Guide website and some examples are shown below. There are female catkins as well, but these don’t contain pollen, which is one way to tell them apart.
Some trees have flowers that look more like what we learn about at school, so-called ‘perfect’ flowers, with both male and female parts. Examples of trees with this type of flower structure include maples, hawthorn, lime, horse chestnut and many fruit trees including apple, cherry, pear and plum (see below).
Gymnosperms do not have flowers at all, instead they have male and female cones (also called strobili). 98% of gymnosperms use the wind for pollination, with the male pollen cones releasing their pollen into the wind to find its way to females.ref Because this is a bit of a hit and miss approach, gymnosperms produce a *lot* of pollen – one study estimated Juniper pollen production to be up to 532 billion pollen grains per tree!ref These vast quantities of pollen create pollen clouds, which you can see in a video on youtube here.
Another nifty thing is that female conifer cones produce a ‘pollination drop’ – this is a drop of liquid which sits on the surface of the cone to catch wind-borne pollen. As soon as pollination takes place, the drop is quickly retracted back into the cone.ref And you’ll notice that often male pollen cones are positioned at the top of a tree and in open positions along the stem (ie. not covered by leaves), to give their pollen the best chance of going far and wide.ref
Male cones on gymnosperms are smaller and less conspicuous than females, but, I think they’re still beautiful and worthy of our appreciation. Here are some examples of gymnosperm male cones:
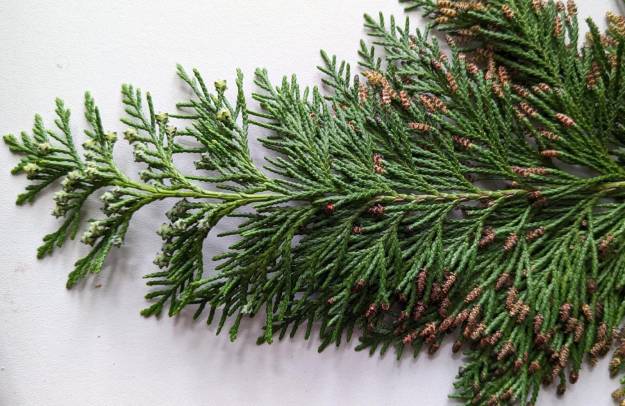
Conifer species which have leaflets have a sort of tree-within-a-tree approach – such as the cypress below. – it has browny-pink male pollen cones on the ends of the shoots towards the back of the leaflet, and green developing female cones on the ends of the shoots at the tip of the leaflet.
There are more great images including scanning electron microscope images of gymnosperm pollen in this research paper.
But what if the trees in your bonsai collection don’t have any flowers or cones at all? Unfortunately this is a sign that they haven’t yet reached their reproductive phase. It’s hypothesised that a plant’s transition to its reproductive phase happens after a certain number of cell divisions have taken place.ref If you keep pruning the new growth off, your tree may never reach a reproductive phase, since it may never achieve the number of cell divisions required. The only way around this is to let your tree grow, use a mature tree to begin with, or use grafted material which comes from mature trees.
In the meantime, make sure to take a good look at your trees and the trees around you, and appreciate the underrated male tree flowers when they make an appearance.
Flat leaves are found across the conifer families including Taxus, Cephalotaxus, and even in Pinus (check out Pinus krempfii) as well as many of the Araucariaceae and Podocarpaceae families. Commonly known trees with this leaf shape include all varieties of yew, swamp cypress, dawn redwood and coast redwood. Here are some examples:
Taxus baccata (Yew)Wollemia nobilis (Wollemi Pine)Cephalotaxaceae (Plum Yew)
Conifer flat leaves are relatively inefficient from a photosynthesis point of view, since water and photosynthates have to travel further to reach the vascular bundle/s.ref As a result, they have better photosynthetic efficiency in humid, low light environmentsref and are more common where it is wet or tropical. In these areas their greater leaf surface can help them attract the energy they need without drying out due to having more stomatal openings on their surface.
The primarily southern hemisphere family Podocarpaceae is super interesting and not one that I have worked with much from a bonsai perspective, although buddhist pine (Podocarpus macrophyllus) is a species commonly found as an indoor bonsai in the UK. (It is hardy down to just below -10°C so could be an outdoor bonsai as well). Podocarpaceae are interesting from a foliage perspective, as they have evolved a wide range of different leaf shapes which in some cases have become similar to angiosperms and take the forms of flattened leaves with modifications that allow them to grow larger. Below are some examples from which it’s clear that this family has found a workaround for the venation constraints of others in the conifers.
One study mapped the structure of Podocarpaceae leaves and created a cross-sectional image for each sub-family, their results are shown below (apologies for the poor resolution but the original paper wasn’t great to start with). You can see that although most species only have one vascular bundle, they also have various mechanisms to get substances to and from it – including the orange ‘organised accessory transfusion’ cells and ‘pitted thick-wall mesophyll’ cells. Interestingly leaf (f) from the image above – the largest leaf – is also shown below and it’s the only one to have multiple vascular bundles (N and O) which is similar to angiosperm leaves.
Whilst the majority of Podocarpaceae are flat-leaved, quite a few members of Araucariaceae have flat leaves as well. The famous Wollemi Pine or ‘pinosaurus’ Wollemia nobilis has flat leaves, as does the equally well-known monkey puzzle tree Araucaria araucana and various others in the family. These trees don’t tend to be common bonsai subjects as their leaves are quite large and observing the Wollemi pine in my garden, they don’t have much variation in their form so wouldn’t be that easy to style.
Also unusual among conifers is the Phyllocladus genus. Plants in Phyllocladus don’t have true leaves at all – any leaves they develop are non-synthetic and ephemeral – ie. they quickly drop off. Instead Phyllocladus use their stems, which have developed a leaf-like flattened form, to photosynthesise.ref These are called phylloclades – see below for some examples from New Zealand:
I know they look identical to leaves – and they contain all the same components including vascular bundles and photosynthesising palisade and mesophyll cells. The nuances of why they are not leaves but flattened branches instead are based on the way they develop and branch, and the relationships between organs – if you want to read the details refer to this excellent paper. But sometimes they may get lumped in with flat leaved conifers.
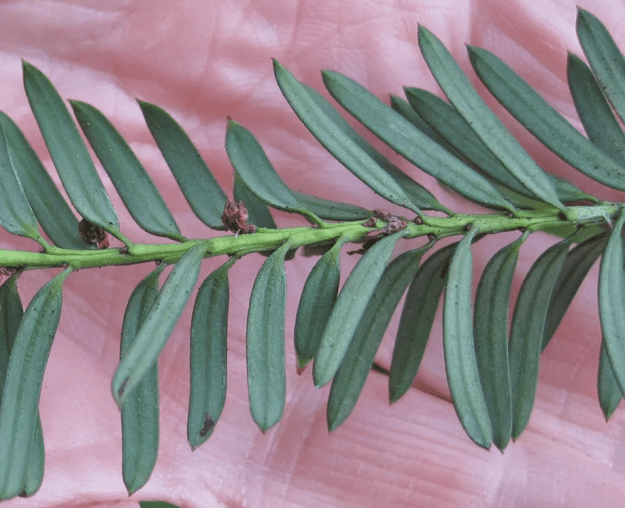
Which brings me to Taxus or yew. This is a very common bonsai subject, with its own family, Taxaceae. Yew leaves are famous for two things. Firstly, along with every other part of the yew except for its aril (the red ‘berry’), yew leaves are renowned for being extremely toxic. They contain ‘taxine alkaloids’ of which only a small amount is needed to bring on “dizziness, nausea, vomiting, diffuse abdominal pain, cardiac arrest, respiratory paralysis and death” in all animals including humansref. Secondly, they are one of the few conifers which are known to do just fine in shady positions, although they are also happy in full sun as their leaves adjust to different light levels.ref
Taxus have a unique stomatal feature called ‘papillose’ cellsref which can only be described as ‘pimply’ (see below) – basically the entire surface of the leaf has tiny protrusions as part of the cuticle structure. The presence of these pimples is one of the ways of identifying a Taxus leaf. I couldn’t find any clear explanation as to the role of these papillae, except perhaps to provide some level of water-repellence.ref Taxus are known to harbour endophytes (microbes) in their leaves which help combat pathogensref so it could be that the nooks and crannies created by papillae are a nice home for endophytes.
Anyway, what of all this is relevant for bonsai? It sort of depends on which flat-leaved species that you have. Many will be suited to humid and/or low-light environments, so keep an eye on your watering and don’t let them dry out – they will probably appreciate a misting every now and then. Full sun may not be necessary – or may even be over the top depending on your location – but as always find out what a given species needs as there are lots of quirky members of this club with their own unique requirements.
I’ll be honest, I find conifer needles to be quite weird. As someone raised in the southern hemisphere, true pine trees were something we had at Christmas and that was about it (this is true because the most common Christmas tree found in Australia is Pinus radiata). But actually, needles really are just plain old leaves. They contain all the same components as ‘normal’ leaves, like an epidermis, photosynthesising mesophyll cells, green chlorophyll pigment, xylem/phloem, stomata and so on. They just happen to have pushed the ‘leaf’ form to the extreme, ending up extremely long, thin and tough.
Within conifers, what are *called* needle leaves are found across most of the families, including Araucariaceae (Norfolk Island pine, Cook pine, Hoop pine), Cupressaceae (juniper, Thuja, Cryptomeria japonica), Pinaceae (pines) and Podocarpaceae (Platycladus).
At this point though I think it’s important to point out that the Pinaceae family is the least similar to all the other conifer families, having diverged from them very early in evolutionary history. Look at the ‘family tree’ of conifers below and you can see that Pinaceae including pine, cedars, larch, fir and spruce, has been evolving separately for the longest of any conifer family. This means that ‘needle leaves’ in Pinaceae are not the same thing at all as needle leaves in other families, and they probably need to be treated as two separate sub-categories.
This is why it can be confusing to understand what people are talking about when they refer to needle leaves in conifers. Needle leaves in Pinaceae are obvious – they are long, thin, spiky, tough, 3-dimensional and in mature foliage form in clusters known as fascicles which are actually short shoots (see my post on shoots for more on these). What you and I would call pine/fir/spruce needles – as per these examples:
PineCedarSpruce
Needle leaves in other families are a bit more ambiguous. Sometimes they are referred to as ‘awl-shaped’ or ‘sabre-shaped’ and often they have a needly element but also a scale-leafy element. Needle leaves in these families, such as Juniperus and Cupressus, often mature into scale leaves. Here are a few examples of non-Pinaceae needle leaves:
As is obvious, these are different to Pinaceae needles and it’s not just the leaf shape and configuration – one major difference is that these species usually have a photosynthetic stem which pines definitely do not have. You can sort of see how these leaves could change to become scale leaves by the way they are attached to the stem in alternating pairs – if they just shrink and get closer to the stem you could see a mature scale leaf emerge.
For the sake of the rest of this post, I’m going to focus on Pinaceae needle leaves, since these are persistent needles whereas most of the needle leaves on other families are juvenile (although there are some exceptions).
One of the key attributes of Pinaceae needle leaves is that they have a 3-dimensional profile – usually with a quadrangular, triangular or semicircular cross-section, as shown in the images below (1,2,3 & 5 needle pines):
https://www.flickr.com/photos/146824358@N03
Anatomically, Pinaceae needles are like other conifer leaves in only having one or two vascular bundles for water & sugar transport. Their stomata are arranged more or less evenly around the needle and appear in lines. But needles are unique in having an unusual type of mesophyll cell (a cell used for photosynthesis). Instead of cylindrical palisade cells lined up under the epidermis like other plants, needles have frilly looking ‘arm palisade parenchyma’ (see below). These have very lignified (woody) cell walls which intrude into the cells and it is this feature which is thought to provide needles with their extreme cold resistance.
arm palisade cells (pine needle)Pine needle with arm palisade cells
Pinaceae needles are actually *the* most frost-hardy leaves of all. Mountain pine needles survive temperatures down to −93°C and can still perform gas exchange (oxygen for cell respiration) even when their needles are frozen.ref They are also highly resistant to herbivory, due to being tough, spiky, full of toxic resins and not very nutritious. And they live anywhere from 2 to 45 years (Bristlecone pine has the record).ref The needle is one tough leaf!
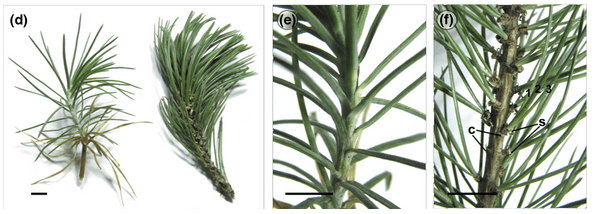
Pine foliage is also heteroblastic – which means it has one type of foliage during its juvenile phase, which lasts 1-3 years, and a different type during its mature phase. Juvenile needles don’t appear on fascicles, instead developing directly on the stem, and their profile is more flattened – although it’s not super noticeable until you know to look.ref Mature foliage develops in fascicles (bundles) and is the familiar three dimensional profile – they fall off as a group when the fascicle falls off. See examples below – Pinus cembroides juvenile on the left and adult on the right of both frames.
Juvenile and mature needles have different properties with juveniles having 3x the photosynthetic capability of mature needles. This is believed to be able to provide such species with a ‘fast return’ strategy whilst establishing and a ‘slow return stress-resistant’ strategy when older.ref
Surprisingly needle leaves actually have better photosynthetic performance than other conifer leaves – despite that fact that Pinaceae have lost key genes required for photosynthesis in other plants.ref Their improved performance is believed to be because water has to travel further than in non-needle leaves, but there is likely also a genetic factor which hasn’t been discovered yet.ref Needle leaves take a couple of years to reach their full photosynthetic capacity, but once they do, from then on it reduces with age. One study found that for spruce leaves this declines linearly from the 2 year point, reducing to 30% or less of the maximum photosynthetic capacity by the 6 year point.ref
When photosynthesising, trees need to deal with transpiration, which is the evaporation of water from the stomata in their leaves and is the main driver of their water requirements. Needle-leaved trees have a massive advantage in this domain, as many species have wax deposits in their stomata which reduce transpiration. It has been found that wax deposits in Sitka spruce stomata reduce transpiration by two thirds but photosynthesis by only one third.ref Unfortunately these waxes are degraded by pollution, so needle leaved trees can dry out in high pollution areas.ref
Since needle leaves can generate more energy from the light they have, and from a wider range of sun angles, they can survive in poorer light conditions than flattened-leaved species. Along with their cold resistance and ability to minimise transpiration, this is why the boreal forest comprises mainly Pinus, Abies and Picea species, which all have needle leaves.ref
Finally a note on buds and how needle leaves develop on a tree. Leaf buds on mature needle-leaved species form as part of a shoot rather than individually, and these are usually determinate, which means that everything is formed inside the bud. So before bud break the leaf primordia (baby needles) are sitting inside the bud. Below are some cross-sections of long shoot pine buds (which you might know as candles) and a spruce bud (on the right). The brackets show where short shoot buds are located, and within these the baby leaves are waiting to emerge with the shoot.
Contrary to some advice, needles do all their extension in their first year of growth. After this they replace or add to their phloem annually, but not their xylem.ref This means there may be some thickening of needles, but no lengthening after the first year. They may be shorter with increased dryness and poverty of the soil.ref Eventually needles fall off along with their fascicle and the other needles in their group. However, pines have been shown to retain their needles up to twice as long if they have been defoliated (eg. by insects).ref
What’s the impact of this all for the bonsai enthusiast? Firstly your needle-leaved species are going to be tough, they will cope with reduced water, poor soil, wind, rain and freezing temperatures. They definitely do not want to be inside.
Secondly as per conifer leaves in general, needle leaves are not as plastic or regenerative as angiosperms – they are part of a shoot and form in the bud, so there aren’t as many styling options as you find with angiosperms or even flat or scale-leaved conifers. And they have a more relaxed time frame than angiosperms do – needles may stick around for a long time – usually this will be 2-4 years in most species and low-medium elevations but can be a lot higher. So your styling decisions can’t be completely redone on an annual basis – a better approach for needle-leaves is a gradual evolution towards a vision. These trees suit bonsai practitioners with patience and a slow, thoughtful approach.
Bonsai folk like small leaves and in the case of needles, short needles. This is achieved in one of two ways. The first way is that long shoots (candles) are completely broken off early in the growing season. This forces the tree to activate dormant foliage buds at the base of the shoot, which don’t have the time or resources to develop full length needles. I’m not sure whether breaking the part of the candle off (as is also advocated) would also reduce needle size since this retains the active short shoots at the base of the candle to still develop. This practice might have a slightly different effect of creating more short shoots with more needles, so giving denser foliage, rather than shorter needles. The second way to reduce needle size is to starve the tree of water and nutrients, but I’d say manipulating candles would be better for the health of the tree. Obviously to add branches to a tree you need to leave the long shoots in place to develop, as these are what create the long-term framework.
To finish off, I just have to share one of the brilliant images created by Gerhard Vicek who does microscope cross-sections of plants – below is a cross-section of a Cedrus atlantica needle. The beautiful staining he does of his samples makes the different cell types really clear. There are epidermal cells (in red) on the outside, below these the unusual frilly arm palisade cells (in green). Then you have the transfusion cells in a brown & white ring, which move water to the outside of the needle and sugars to the centre. In the centre you can see two vascular bundles with the tiny xylem & phloem cells. Truly his images are art for the bonsai science nerd!
Please visit Gerhard Vicek’s’s website for more great microscope images of trees: foto-vision.at