Author Archives: Bonsai Nerd

Can I tweak soil pH to make my tree’s flowers a different colour?

The answer is, surprisingly, maybe.

You might be familiar with the use of red or purple coloured leaves or flowers as a test for pH – I used red cabbage leaves in the soil medium pH experiments for the post Water hardness, pH and bonsai. The pigments in these leaves and flowers (usually anthocyanins – read more about them here) respond to pH by changing colour quite predictably. But how leaves or petals behave in a dish with acid or alkali bears no relation to how they develop as organs of the plant.

I came into this post with the hypothesis that pH would not affect flower colour. The internal environment of all cells – including those of plants – is actively regulated and buffered to avoid variation – a process known as homeostasis. Cells need to maintain a stable internal environment for the biochemical reactions of life to operate effectively. Key cellular attributes like temperature, pH, salinity, glucose levels, metals and other nutrients are carefully balanced, and cells have specific mechanisms to adjust these up and down within a band of tolerance. So adding acid or alkili to a plant’s growing medium doesn’t make their cells more or less acidic, and if that doesn’t happen then it wasn’t clear to me how the pigments in the cell vacuoles could react with anything to change colour.

But it turns out that what can end up changing a plant’s flower colour is the presence of metal ions. If you’ve read my post on nutrients, or probably even if you haven’t, you’ll know that a certain amount of trace metals are necessary for biologically essential processes, many of which include metal ions in the relevant enzymes (like RuBisCO which has a Magnesium ion and is a crucial enzyme in photosynthesis). Plants need these metals, but overdoses of essential elements negatively affect plant metabolism, so they have evolved mechanisms to handle excess amounts.

One of these mechanisms is chelation. Chelation is when a metal ion reacts with another molecule to form a complex, taking the metal out of its reactive, ionic state. Metal ions chelate with pigment molecules in plants such as anthocyanins and flavonoids, creating compounds known as metalloanthocyanins, or metal-flavonoids. The formation of these compounds shifts the colour spectrum previously displayed by the pigment.

A variety of metal ions have been shown to form these complexes, including aluminium (Al3+), iron (Fe3+), magnesium (Mg2+), and calcium (Ca2+). Laboratory studies have also shown that other ions, such as cobalt (Co3+), manganese (Mn2+), zinc (Zn2+), and cadmium (Cd2+), can produce various colours when chelated with anthocyanins.

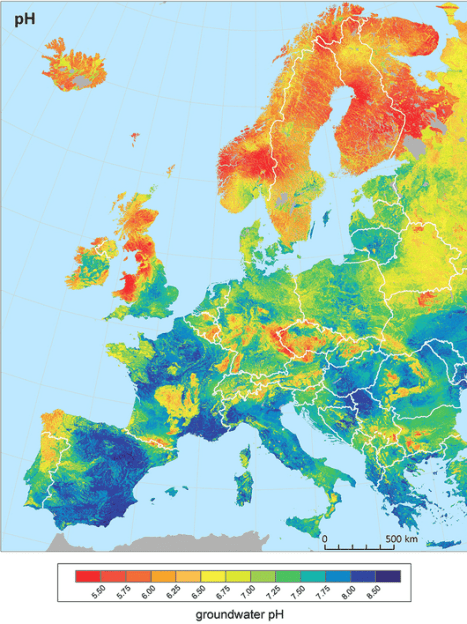
The key relationship with pH is that these positively charged metal ions are more bioavailable to plants in acidic soils. This means in acid soil more positively charged metal ions (if present) are taken up into the plant, when excess amounts are dealt with through chelation with pigment molecules.

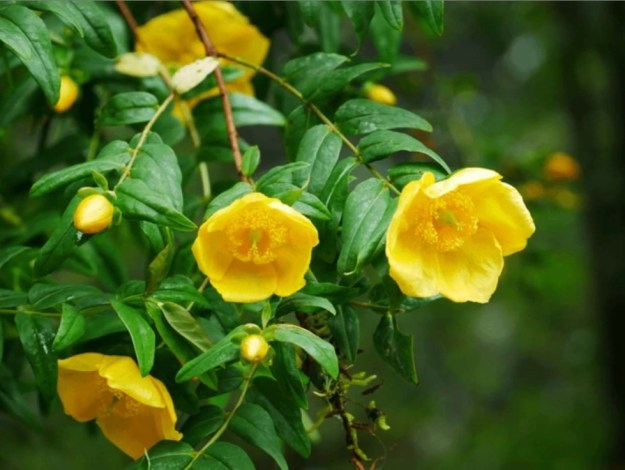
Some examples are (left to right below), Hydrangea (goes blue with Aluminium in an acidic environment), Camellia japonica (some cultivars produce purple flowers through Aluminium chelation), Camellia chrysantha (deep yellow colour comes from Aluminium chelation with quercetin flavonoids), and Centaurea cyanus (Cornflower) which requires Iron and Magnesium for its blue colour, as do Petunias.

The addition of magnesium has been shown to increase the content of anthocyanins and enrich the flower colours of various ornamental plants including Anigozanthos flavidus (red flowers), Limonium sinuatum (blue bracts), Gypsophila elegans (pink flowers) and Aconitum carmichaelii (blue flowers). Magnesium supplementation in grapevines has also been observed to brighten grape colour.

Obviously not many of these are common bonsai species. In theory, based on the information in this post, trees with pink flowers such as hawthorn, azalea, cherry and even the leaves of Japanese Maples could operate on similar principles. Azaleas and Japanese Maples are thought to be less vigorous and colourful in alkaline soils, but I haven’t found any evidence linking this specifically to metal chelation. So for sure if you have a Hydrangea bonsai then this will change colours based on pH – and the presence of Aluminium. But for the rest there isn’t any evidence for or against. If anyone would like to do some experiments and share their results, please get in touch.

Editor’s note: for the first time I used Google Deep Research to assist with writing this article. As a result the references don’t line up to exact sentences like in my other posts. I’m not sure I like this, and may change my approach for future posts, but in the meantime below are the references which were relevant to the content I ended up using.

Pine pollen pics

May is pine pollen time at Kew Gardens and today I spent a fun hour or so taking pictures of different pine species and their pollen cones (and a few non-Pinus ring-ins). For the extreme pine nerds among you!

Air layering – an excellent technique for creating new bonsai

Of all the propagation techniques available for bonsai, air layering is surely one of the best. There are so many advantages to this practice! The main one is that it can be used on mature trees with large branches, so that your bonsai ends up with a large trunk from the beginning. If you air layer at an angle to the trunk, and/or at a junction with two or more branches, you can make it even wider again. If you select the right position for your air layer, you won’t need the trunk of the eventual bonsai to grow any more than it already has, which gives you a massive head start compared to other techniques.

We had a surplus-to-requirements magenta crabapple on our allotment which I have air-layered over the last two years – in the first year I did 20 air layers and in the second I did 10. Of these around 15 have survived. Some examples are below – the largest one I did was from a main branch and has a 12cm trunk. You can also see one where I did the cut at an angle to change the orientation of the resulting tree, and make the trunk wider.

Another advantage of air layering is that roots form from callus at the edge of the air layer, which thickens the trunk right down at the base and also creates nice radial roots for good nebari (assuming you’ve properly prepared the air layer).

And there’s more! An air layer is as old as it was on the original tree. If it’s old (or large) enough to have mature foliage, flowers and fruit, it will continue to do so once separated. As far as I can see, this is by far the most accelerated technique for creating bonsai with flowers/fruit and thick trunks (as opposed to cuttings, which also retain the age of the source material, but are usually not as wide).

So what is air layering and why does it work?

An air layer involves ringbarking the tree at the place where you want to separate it into two. By wrapping the bare strip of branch in growing medium, roots are encouraged to grow at this point, and after a period of time, the branch can be sawn through and removed – the section above the air layer will have grown its own roots and can be planted out just like any normal tree. It’s called an air layer because the roots are literally being grown in the air.

Below are some images from my crab apple air layer. On the left is the ringbarked section of trunk prior to applying the growing medium. You can see the matt texture of the wood – all the living cambium has been scraped off (I use the blade from a pair of scissors). In the middle is the separated air layer with its plastic wrap on, and the pot still in place around the roots. On the right is an example after it has been separated and the plastic covering removed (an old compost bag). You can see the roots have developed nicely, circling the pot which was being used to hold the growing medium in place (sphagnum moss).

How the heck does this work?

Air layering takes advantage of the ‘plasticity’ of plant cells. The meristems within plants can become all sorts of different cells depending on the hormonal signals they receive. In the case of air layering, the passage of phloem (the liquid which flows from the leaves and carries the sugars which are the products of photosynthesis) is interrupted. This causes the hormone auxin, which is produced by stems and leaves, to accumulate at the site of the cut. And where auxin accumulates, callus material develops, and roots grow.ref

What types of trees and branches work with air layering?

The positioning of an air layer is more important than the size of branch. Personally I think if you are going to the effort of air layering you may as well choose the fattest, chunkiest branch you can. But it’s important to know that some leaves need to remain on the section of tree above the layer, to drive the air layer root growth, and some need to remain elsewhere with an unimpeded path to deliver sugars to the roots of the main tree. In the image above left you can see there is another branch on the lower left of the air layer, which can supply the roots. If one layer is being placed above another, each needs to have their own source of sugars (ie. leaves with a connection to the layer). The year I did 20 air layers on the same tree, I made sure there were enough branches to go around, so each layer as well as the roots would have an energy source.

That’s the sugar supply, but what about water? Water can still flow to all the leaves on the tree via the xylem, as the xylem layers remain in the outermost part of the trunk & branches. These are not removed when the cambium is removed, so they continue to transport water around the tree.

Now – you may have read elsewhere on my site about ring-porous and diffuse-porous trees. Ring-porous trees only use a small range of xylem cells around the outside of the trunk just below the bark – some grow a completely new layer every year before they let their leaves bud out (eg. oak and beech). I have a hunch that it may be harder to air these species as they are reliant on this narrower xylem band which might be damaged by the layering process. There is some evidence that this is the case – one study could not successfully air layer several American oak speciesref and a quick search of bonsai forums suggests similar anecdotal evidence.

It might be important with these trees to create the air layer after they have leafed out, to be sure they have xylem there for water transport before you remove the cambium. And to be extra careful when scraping off the cambium, to avoid removing the water-conducting layer as well. This won’t be relevant for conifers, which are all diffuse porous and should be air-layerable. I have successfully air-layered cypress as well as juniper and you can see both in the image below (cypress in front, juniper behind on the left):

For angiosperms, you can check whether they have diffuse or ring porous xylem on this website. From experience I can tell you that Acer japonicum and Malus air layer relatively easily.

I have found that on an older section of tree (where the cells may be less plastic and less amenable to becoming root cells), you can increase your chances of success by air layering at a junction with a younger branch. Layering at a junction results in a multi-stemmed tree, as well as larger more interesting nebari, but it also seems from the ones I have done that the presence of the younger branch encourages more vigorous roots.

How do you do a successful air layer?

The basic practice for creating an air layer is to remove a strip of bark around the trunk, with the top of the strip aligned to where you want the base of the trunk of your bonsai tree to be. The strip of bark needs to be completely removed – all the way around the tree – and the cambium layer which sits just underneath the bark needs to be scraped off (sometimes this layer is not very visible but once you start scraping, you will see it coming off). In effect this creates a ‘phloem dead zone’ by removing the cells in the tree which transport photosynthates (the sugars produced by photosynthesis). It’s important that there are no stray cambium cells left, and that the gap is wide enough that it cannot be bridged by any callus which grows.

Once this has been done, the cut at the top of the strip needs to be packed with moist growing material and sealed. Many people will use sphagnum moss, but I have also successfully used half-moss/half-soil, and half-coco coir/half-soil, usually in a plastic pot which I have cut to fit the branch. The medium needs to be quite moist, and thickly packed above, below and around the cut. It has been demonstrated that adding IBA (Indole-3-butyric acid also known as auxin – found in rooting gels) can improve root growth speed and quantity.ref

Once you have packed the cut with moist growing medium, it can be sealed in a plastic bag, or in plastic wrap (I also use a plastic pot under this). I have found it best to attempt to seal the wrap as best as possible, as this maintains the moisture within the air layer throughout the entire period. Moisture is critical for root development. Some people advocate leaving a hole for watering, but I think this just risks the layer drying out and is unnecessary extra effort. I use cable ties to secure a plastic bag around the base of the cut (on the bare trunk) and then wrap it several times around the layering medium before securing it around the top, leaving no gaps. If needed you can also tape up any loose edges with duct tape or similar.

It may be possible to do away with the growing medium altogether and to use a strip of aluminium foil instead. One study found that the reason why this exceeded the performance of moss/plastic on air layered radiata pineref was that the moss absorbed some of the auxin, taking it away from the plant and slowing down callus formation

People often ask how long an air layer will take to grow roots, but it’s very hard to answer this question. I would suggest give it a growing season – in the UK that could be creating it in March/April and separating it at the end of August or in September. If you unwrap it and the roots are not developed enough, it can be rewrapped and left for another season.

The obvious downside of using air layering is that it’s a lot more effort than taking a cutting or growing a seed, and you have to have access to good source material. Also that nobody will mind the presence of plastic bags and cable ties in the tree for the growing season! But the effort really is worth it when you consider the quality of material that can be created – here’s one of my favourites from the crab apple batch, only one year after separation:

To see a video of all the layers that succeeded, in their bonsai pots, please check out my Instagram @londonbotanica.

What are bracts and do they matter for bonsai?

What is a bract? A bract is a part of a plant with which many people are quite unfamiliar. Did you know that all of the below images show bracts? The petal-like structures in the first six images are actually bracts, and in the last three which show conifer cones, the spiky/protruding parts are bracts.

According to my Shorter Oxford English Dictionary volume 1, ‘bract’ is a botanical term which describes a ‘leaf or scale, usually small, growing below the calyx of a plant’. In other places a bract is defined as a ‘modified leaf’.ref In angiosperms (flowering plants), it is part of an ‘inflorescence’ which is the entire flower head, including the stem, stalk, bract and the actual flower.ref In gymnosperms (conifers), bracts can be found on/in cones.

So a bract in reality is its own separate type of plant organ, and not a petal or a leaf. It plays its own role in supporting the plant’s development, which can be wide and varied depending on the species. Different studies have identified bracts to be responsible for protecting the flower from herbivoryref as well as the weatherref, for producing defensive compounds which kill insectsref, for flowering (or not)ref and for attracting pollinators.ref One study found that the presence of bracts is determined by the IFY gene, which either allows a bract to form, or recruits the cells which would have been used for the bract into the flower instead.ref

So what is the relevance for bonsai? Well, bracts are part and parcel of any flowers or cones that you have on your bonsai tree and they develop only once, as part of the inflorescence, or cone. This means that like flowers, fruit and cones, they cannot be reduced in size* in the same way that leaves can, because reducing leaf size is usually done by pruning or defoliation. If you remove the inflorescence or cone, you’ll need to wait until the plant regenerates a whole new reproductive organ and it likely won’t be reduced in size.

This needs to be considered if you want to bonsai a Cornus, a Davidia involucrata or a Bougainvillea. Varieties with naturally smaller bracts are preferable for bonsai, just like varieties with smaller fruit are better. Poinsettia are never going to make good bonsai, even though in their native Mexico they grow up to 3m tall.ref But a species with smaller bracts, such as a hop hornbeam (Ostrya carpinifolia), lime/linden and hornbeam, can be very pretty. In these species you need the tree to be at the reproductive phase in order to produce inflorescences (which include the bracts).

* This isn’t strictly true as there are a number of actions which can reduce the size of flowers & fruit, such as underwatering, and leaving as many fruit on the tree as possible, but that’s a topic for a different post.ref

How to get that conifer resin off your hands and tools

When working with conifers it can get extremely sticky as these trees exude resins from cut stems as well as other organs such as seed cones and needles. We can use our understanding of the chemistry of these resins to work out the best way to dissolve them so we can clean our hands and tools (read on).

Conifer resin helps a tree resist microbial attack, particularly when it is cut, and also acts as a deterrent to herbivory.ref So you can understand why it might need to stick to the stem and cover a wound. Some of the active components of resin which defend against microbes are volatile organic compounds, or VOCs, which evaporate under normal atmospheric conditions.ref This wouldn’t be much use to a plant, so the VOCs are dissolved in non-volatile substances, and resin is this combination of both substances.

One study assessed the composition of resin from 13 species of conifers grown in Taiwan and found that the main non-volatile components were ‘diterpenoids’ – these are organic molecules in the terpene family, shown below. You can also see the volatiles they found in this table – α-Pinene was a common one across species.

https://pubmed.ncbi.nlm.nih.gov/34500678/

To work out how to dissolve such a molecule, we need to know what kind of solvent works against it. The rule is ‘like with like’ – you need a similar molecule to dissolve a substance, specifically as it relates to the electrical charge across that molecule – or its polarity.ref

Water is a great solvent, but only for polar substances – those molecules which have a different electrical charge at one end versus the other.ref Not only are terpenes including the diterpenoids above not polarref, but we already know that water won’t dissolve resin otherwise you wouldn’t be reading this post. For similar reasons soap and water won’t work either, because resin is just too hydrophobic (resisting water).

So we need a non-polar solvent. Unfortunately many of these are nasty substances such as benzene and carbon tetrachloride, which are toxic to varying degrees. They also tend to be produced from crude oil, not exactly a sustainable approach.ref1,ref2

But another non-polar solvent turns out to be plain old vegetable oil.ref

This came to me after remembering my year 12 chemistry teacher explaining how soap works. It stuck in my head that soap is able to dissolve oil because the soap molecule has one end which is attracted to water, and another end which is attracted to oil, which it then disrupts so it can be washed away. So if you can dissolve something in oil first, then you should be able to use soap to wash it away.

And this in fact works really well! Put a decent sized drop of cheap vegetable oil on your hands (you don’t need extra virgin olive oil for this one). Rub the oil thoroughly into the resin and over your hands, and you will quickly see it start to dissolve. Step 2 is to add some hand soap, lather well and rinse. One or two rounds of this will remove even the stickiest, blackest, most persistent of conifer resins. And for tools, you can just use the oil and wipe it off versus washing with soap and water, particularly when you have carbon steel which rusts easily.

How trees mature – understanding development phases

It’s probably obvious that many plants, like humans, go through different developmental phases throughout their lifetimes. In plant biology, a developmental phase describes a period of time during which a stem produces a specific type or combination of organs, such as shoots & leaves (vegetative organs) or flowers & cones (reproductive organs). In fact for plants it is individual stems, not entire plants, which go through these phases and so a single plant can have stems which each are in a different phase.ref

All trees start in a vegetative phase – the initial growth phase when the tree is establishing. Usually this means that only foliage is produced, and no cones, flowers or fruit – in fact the growing tip is not capable of producing flowers during this phase. The vegetative phase can have stages within it, for example juvenile foliage may be produced before adult foliage, however in vegetative phases, stems are programmed genetically to produce only shoots and leaves. Although we often refer to defined ‘juvenile’ and ‘adult’ foliage in trees, it is apparently a bit more complicated, with variation within the phases as well. In fact many different attributes are affected by the stem’s phase, including the size and shape of leaves (as seen in conifer needle and scale foliage), phyllotaxy (the arrangement of the leaves), plastochron (the time between leaf primordia emerging), internode length, adventitious root production, trichome distribution and cell size.ref These are all – as you have probably worked out – genetically controlled, apparently by ‘microRNAs’ref, specifically miR156 and miR172 as shown below.

https://journals.biologists.com/dev/article/138/19/4117/44565/The-control-of-developmental-phase-transitions-in

Examples of juvenile and adult foliage are shown below, these show stems which have undergone a vegetative phase change.

https://www.genomebc.ca/blog/comparative-transcriptomic-analysis-of-juvenile-and-adult-leaf-morphologies-in-conifers

A phase change is when a stem starts producing a different type of organ from its growing tip (meristem). For example, it starts to produce buds which will become flowers. Phases changes are usually – but not always – stable – that is they don’t tend to move in reverse order. Once a tree has reached the reproductive phase on a particular stem, it should retain that capability since the meristem has changed to the new phase. As an illustration of this is that when propagating cuttings and air layers, once they are successfully rooted, the stem will maintain the properties it had on the tree (until that stem goes through the next phase change). If it had flowers before, it will continue to flower. In some species – particularly conifers – if the stem was horizontally oriented it will continue to grow horizontally.ref

One good example of phase differences on a tree is suckers. Suckers are shoots which emerge from the base of a tree, and as they are derived from buds which have not passed through the same growth process as the rest of the tree, they are usually juvenile vegetative shoots, even if the main branches of the tree have reached a flowering phase.

One study found a logical sequence of developmental phases based on biochemical factors which turned on certain genes.ref They found that substances which are important for embryo development in the seed promote the initial vegetative phase. It’s then sugars – the product of photosynthesis – which contribute to an ‘adult’ vegetative phase change. So continued photosynthesis and the production of more sugars over time, promote phase change. Plant growth regulators (aka phytohormones) also play a role, with Gibberellin A3 shown to revert ivy back to juvenile foliageref, although the exact interplay with auxins and other substances is still not clear as of 2020.ref A key finding from this study was that defoliation delays vegetative phase change – so don’t defoliate or prune if you’re trying to develop mature foliage!

When a stem moves into a reproductive phase, the structure of the growing tip changes so that floral organs (which become flowers) are produced instead of shoots & leaves. In woody perennials (ie. trees) which have reached the reproductive phase, stems can transition between vegetative and reproductive, allowing them to continue to grow, as well as reproduce.ref For example, they may produce vegetative buds at the start of the new stem, reproductive buds in the middle and more vegetative buds at the end.ref This is all regulated by genes. One study on poplar identified two genes which control this transition based on environmental conditions – illustrated in the diagram below. The gene FLOWERING LOCUS T1 drives reproductive onset – in experiments, FT1 caused vegetative meristems to transition to reproductive when it was expressed in response to winter temperatures. As a result, the organs developing inside the winter bud moved from vegetative (formed earlier) to reproductive (formed later when it was colder). This created a bud with both forms of stem waiting to emerge in spring. Its partner gene FLOWERING LOCUS T2 then took over during warmer weather and drove vegetative growth.

https://www.pnas.org/doi/pdf/10.1073/pnas.1104713108

If you are working with material which has not yet flowered, you would probably like to know how long it will be before it does, and what you can do to encourage your tree to flower. This is where horticulturalists use the concept of ‘growing degree days’. Growing degree days is a measure of the amount of heat that a plant has received over its lifetime (this would also be associated with the amount of light, which as we read above drives sugar development which in turn encourages phase change). Growing degree days (“GDD”) are used when planning crops and flowering annuals & perennials. They are calculated as follows:

GDD = t (days) x ( (TMAX+TMIN)/2 −TBASE)) ; where TMAX and TMIN are daily maximum and minimum air temperature, and TBASE is a known baseline temperature.

For example, I have recently been trying to grow the Australian plant Sturt’s Desert Pea (Swainsona formosa). Studies have shown that this species requires 874 GDD for 100% of axillary branches to flower and 988 GDD for 100% of main stems to flower.ref This is an extremely high light and temperature requirement for what is effectively an annual, so I have a heat lamp (and a grow lamp) providing daytime temperatures of 28oC and evening temperatures of 18oC. The base temperature for the calculation is 5oC.

So the number of days theoretically required to achieve 100% flowering on axillary stems using my setup will be a minimum of 874 / ((28 + 18)/2 – 5)) = 874 / 18 = 49 days.

You can see that if this relationship is true then global warming will shorten the flowering time of plants since plants will achieve their GDD faster. And this is what has been observed; in the UK researchers found that plants are flowering a month earlier due to climate change.ref

For trees which have to first achieve reproductive maturity, then generate floral organs, it’s likely that both growing degree days and other environmental accumulations (such as a cold period known as vernalisation, light levels and total rainfall) are involved.ref The key point is that these are accumulations of the factor in question, which implies that time is needed, as well as the correct conditions.

What does this all mean for bonsai?

Firstly if you are obtaining material for bonsai, consider what type of phase you want for the tree. If you want a flowering tree straight away, you need to take a cutting or air layer from a stem which has reached the reproductive phase. A sucker, or seed, will start from scratch right at the beginning of the tree’s development – and depending on the species it may never flower or fruit the entire time that you own it! As has been noted elsewhere in this blog, if you have a tree with juvenile foliage and you keep pruning it back, it may never reach an adult foliage or reproductive phase, because it may not have accumulated the amount of sugar or growing degree days to move to that phase. So when sourcing a new tree, if you want fruit or flowers you should make sure that it has produced these already.

Also, the environmental conditions which your tree is naturally used to are important for its phase transitions. Using the above example, if you put a poplar indoors where it never gets the cold temperature signal to activate FT1, it won’t create flowers or seeds. When you have a non-native tree in your collection, it’s a good idea to research its usual climate and to try to replicate it as much as possible.

Spray bottle with detergent

SB Invigorator

Another product which pops up as a recommended one in the bonsai world is this one – SB Invigorator. This product is for pest control and claims to control “Whitefly, Aphid, Spider Mite, Mealybug, Scale and Psyllid.”ref As I have recently added a lot of indoor plants to my collection, these pests are becoming rather annoying, so I have been looking for ways to get rid of them without using toxic chemicals. Would SB Invigorator work?

The main claim for this product is that is uses a “physical mode of action”. However the manufacturer fails to explain what this actually means, so it sort of floats in the ether as a claim without any rationale. A physical mode of action is basically one which physically affects the pests in question. Scraping a pest off a leaf or squashing it with your fingernail would be a physical mode of action. Horticultural oil such as neem also uses a physical mode of action by altering the leaf surface characteristics.ref This method does not rely on poisons, instead it disrupts pests’ ability to move around and/or eat your plants.

What is the physical mode of action in SM Invigorator? Well, there are a couple of clues in the company’s safety data sheet and more in the company’s product manual for commercial users.

The main hazardous component (ie. the one which must be identified on the safety data sheet) is Sodium Lauryl Ether Sulphate (1-3% by volume), also known as SLES. SLES is an ‘ionic surfactant’, basically a detergent and foaming agent. A surfactant is a substance which reduces the surface tension of water of a liquid – on a plant this can make the surface slippery to insects and harder for them to gain purchase on a leaf or stem. In fact plants themselves make surfactants, known as saponins, below is an image of the saponins created by the fruit of Sapindus makorossi in a research study into the subject.ref You can see the foam in the tube, which has been shaken – this is due to the surfactants making it easier for air bubbles to be created.ref

https://www.mdpi.com/2413-4155/3/4/44

Side note – the study identifies a range of plantsref which produce high quantities of saponins, including chickpeas. The saponins in chickpeas result in the sticky liquid left behind when you strain a can of chickpeas – also known as aquafaba. The surfactant properties of aquafaba are used to create meringues and other dishes which require air bubbles, without the need to use eggs.ref

So one of the main ingredients in SB Invigorator is detergent, the likes of which can be found in many consumer detergents. How does this affect pests? According to their product manual, which is published for commercial users, “two separate modes of action have been observed: (1) adult whitefly have been observed to stick by the wings to any surface they make contact with and aphids, juvenile whitefly and spider mite if directly hit are trapped by its wetness. (2) On mealybug an initial application removed the protective wax and a second application controlled them.”

This is why they also promote one of the features of the product being “plant wash for a cleaner, shiny appearance”!

I was interested that the biological control company ‘Dovebugs‘ had contributed to the product safety data sheet. I thought perhaps there were microbes in the product as well. But instead I believe they must have been consulted about the effect of SB Invigorator on beneficial microbes. The company’s informationref states “Studies so far have shown SB PLANT INVIGORATOR to be compatible within an integrated pest management programme where beneficial insects are used.”

On other websites selling this product there are several additional claims which are not listed on the company’s website including:

  • “SB Plant Invigorator contains naturally elements, such as seaweed”ref [this would act as a fertiliser, particularly good at providing micronutrients]
  • “improves plant health due to the inclusion of chelated iron and nitrogen fertilisers.”ref [more standard fertiliser]
  • “Active ingredient: Carbonic acid diamide/urea”ref [source of nitrogen = fertiliser]
  • “based on a blend of natural ingredients, including surfactants, amino acids, and plant extracts.”ref [as above]
  • “is a foliar feed that can be used on an extensive range of ornamental and edible plants. The spray contains a wide range of nutrients and micro nutrients that encourage growth and improve the condition and health of the plants when sprayed on the leaves.”ref [foliar fertiliser]
  • “Consisting of blends of surfactants and nutrients or fatty acids and algae extracts”ref

So if the above are true, in addition to the detergent component, SB Invigorator may also contain liquid seaweed and some fertiliser. Since the product is sprayed on the leaves, it could be acting a a foliar feed (see my article on the effectiveness of these here) as well as a general fertiliser since any runoff would end up in the soil.

On Amazon 500ml of this product is currently £13.45. Assuming their product data sheet reflects the diluted product, with 1-3% of SLES, it’s pretty similar to my eCover washing detergent (with 5-15% surfactants undiluted) which is worth 70p for an equivalent concentration and volume. Let’s say it also has 10% or 50ml of liquid seaweed – based on my Shropshire seaweed purchase recently this would be worth 67p – or to be generous 100ml, which is £1.34. Add to that 50g of Chempak 3 fertiliser (probably way too much since 800g makes 1600L) – worth 63p and you have a grand total of £2.67 for a DIY version.

Now one big caveat here is that the actual proportions of these components may be important, and this company appears to have tested their product – although they have not made their tests publicly available. Since the company is based in Guernsey their financial reports aren’t publicly available either, so it’s not possible to read about their company in much detail. So maybe there is a magic formula which they have perfected and of course there are the costs of management, marketing, packaging, distribution etc.

But, if you can’t afford SB Invigorator, and you wanted to try something similar as a do-it-yourself version, you could do worse than start with the recipe for insect deterrent provided by Jerry Coleby-Williams (a botanist, presenter on Gardening Australia and environmentalist). He says his grandad used to use ‘white oil’ for controlling scale. This recipe suggests mixing half a cup of dishwashing detergent mixed with two cups of sunflower oil, and then using one teaspoon of concentrate mixed into a litre of water. If you wanted to, you could add some seaweed extract and/or fertiliser as well.

Note – I tried a detergent solution to get rid of aphids on some succulents in my indoor plant collection (actually Portulacaria afra) and it made the leaves drop off! I think the solution was nowhere near diluted enough (it was before I read Jerry’s recipe). So do a test leaf before you spray everywhere.

Water hardness, pH and bonsai

I live in London, a city sitting on a giant chalk deposit which formed in the Cretaceous period and stretches all the way to France (via the Eurotunnel)ref Chalk is a form of limestone made up of the shells of marine organisms, and is comprised mostly of Calcium Carbonate (CaCO₃).ref According to my water supplier (Thames Water) “When your drinking water seeps through this rock, it collects traces of minerals like magnesium, calcium and potassium. This is what makes it hard.”ref

As you can see the water in my area is towards the harder end of hard. But there are plenty of places in Europe with hard water as well, as you can see in this map which comes from a study measuring groundwater in 7,577 sites across the region – most areas in fact are hard with exceptions in Scandinavia, Scotland and northwestern Spain (where igneous/volcanic bedrock dominates)ref:

https://essd.copernicus.org/articles/13/1089/2021/#&gid=1&pid=1

What is also interesting from this research paper is the corresponding map of groundwater pH (see below). Groundwater pH determines your tap water pH if that’s where your drinking water comes from. Some areas source their drinking water from surface water as well, such as lakes and running watercourses – for example in Sweden it’s 50/50.ref

pH is closely associated with water hardness, with higher levels of calcium carbonate leading to increased pH (in the world of agriculture a common practice to raise the pH of acidic soils is ‘liming’ – or adding calcium carbonate)ref. Look at the areas in Southern Spain and France below which are pH 8 and above – their groundwater is also hard as shown in the map above.

The water in my taps is pH 7.75, so getting close to 8 which is relatively high. Not only that, but continued watering and drying of a bonsai medium with calcium-carbonate-rich water could increase the concentration of calcium carbonate in the pot and potentially make the pH even higher. But is this a bad thing?

To answer that question we need to take a detour into pH and what it actually means. At this point you can be thankful that usually I wait for a couple of days before posting, because otherwise you’d be deep in the weeds of ions, acids & bases and cursing my lack of editing skills! The (relatively) simple version is that pH is a measure of the concentration of hydronium (H3O+) ions relative to hydroxide (OH) ions in water. In a neutral solution like pure water, they are at equilibrium and there is the same amount of each. The chart below shows the different ratios of hydronium to hydroxide ions at each pH. You will notice that in the red section there are more hydronium than hydroxide – this is acidic. In the blue section there are more hydroxide and less hydronium – this is alkaline (aka basic).

https://chemed.chem.purdue.edu/genchem/topicreview/bp/ch17/ph.php#ph

pH is mainly a useful way of describing a chemical environment, as it helps to explain how other chemicals will react in that environment. For example, when a low pH (acidic) solution reacts with many metals, hydrogen gas and a metal salt are created.

pH is one of the fundamental attributes that affects living things – including plants. In living cells a difference in pH across the cell membrane is harnessed to drive some of the most fundamental processes for life itself – photosynthesis and respiration.ref1, ref2 Living things are generally very good at managing the pH inside their cells and have feedback processes to adjust it up or down according to their needs and the environment (called homeostasis). Studies have shown that pH within plant cells is maintained at a small range of 7.1–7.5.ref

It’s when plant cells interface with the outside world, such as when taking in nutrients from the soil, that pH can make a difference to the efficiency (or not) of these reactions. Nutrients are taken up by plants as ions – ie. dissolved in water. This means that they need to be in solution for root hairs to take them up, and that solution can be acidic, alkaline or neutral.

Dissolved substances in the soil water (which change its pH) can also change the availability of nutrients – for example calcium ions will react with phosphorus ions to make calcium phosphate, so the phosphorus is unavailable for plants.ref But plants adjust their uptake according to these changes, so when they detect pH levels which reduce nutrient availability, in many cases they adjust their uptake to compensate, and these forces work in opposite directions.ref The overall effects of pH on the availability of nutrients to plants are a combination of the effects of pH on absorption by soils and the effects of pH on plant uptake.

Below is a chart showing the absorption of different nutrients by soil (in this case geothite, an iron rich soil). You can see that due to their different chemical makeup, each nutrient has a different absorption rate – the higher the absorption, the less available for plants.

https://media.springernature.com/lw685/springer-static/image/art%3A10.1007%2Fs11104-023-05960-5/MediaObjects/11104_2023_5960_Fig2_HTML.png

Negatively charged metals (‘anions’) have a more consistent soil absorption profile – and most are absorbed by the soil eventually when the pH is 6 or above. But uptake by plants is significantly increased as pH rises.

So far it seems like acidic soils might provide more nutrients – but also more toxins (eg. cadmium, lead & aluminium). But the release of organic matter, including nitrogen, sulphur and the activity of microbes which perform this breakdown, is increased at higher pH, and the uptake of metals is increased.ref So it’s really a conundrum to work out the net effect of all these interactions! What do we actually know? Some findings include:ref

  • Phosphate fertiliser is least effective near pH 7; it is necessary to apply more of it to achieve the same yield as at lower pH. It is most effective near pH 5
  • Boron uptake is consistent between pH 4.7 and pH 6.3, but a 2.5-fold decrease occurs at pH 7.4
  • Molybdenum uptake is eight time higher at pH 6.6 compared to pH <4.5ref
  • Uptake of metal ions from solution by plants is increased by increasing pH – but their availability is decreased. This applies to toxins as well as nutrients. Magnesium and potassium are two important nutrients to which this applies.
  • Sulphate’s absorption by soil decreases markedly with increasing pH but plant uptake also decreases – the net effect has not been determined.

There is actually a fantastic diagram which shows the best soil pH range for each plant nutrient – you can see this all over the internet and it looks so useful! But unfortunately this diagram, which was created in the 1940s, is incorrect and has no real numbers behind it.ref In reality “nutrients interact and different plants respond differently to a change in pH” as described above so there is no one-size-fits-all diagram.ref

While I’m in mythbusting mode, there isn’t any such thing as ‘soil pH’ either! As noted in this excellent study from March 2023, pH can only be measured in a liquid. Unless you are over-watering, it’s likely your soil is not a liquid, therefore the soil itself does not have a pH. The pH that is being measured when ‘soil pH’ is measured is actually the pH when the soil is mixed with water – whilst this is indicative of the pH that might be present on individual soil particles, there is probably a range of pH instead across different particles. The pH of the water on a soil particle and the pH of the water on a root hair combine to create the true pH environment for a particular nutrient on a particular root. This is obviously not very easy to measure! See the end of this article for my bonsai media pH experiment.

The study mentioned above basically claims that most studies on pH and soils have failed to take into account the interplay between availability in the soil and plant uptake of a nutrient, which often work in opposite directions and so pH should not be taken to be the main factor in nutrient uptake except in specific circumstances. But looking at all of the above, it does seem like slightly acidic conditions should optimise all of the different reactions taking place – between 6 and 7 pH.

To bring it back to my bonsai, in my London garden with hard tap water of pH near 8, on the surface it would appear that this has the potential to cause a phosphorus deficiency in my plants, and perhaps affect their boron, molybdenum and metallic ion levels (we care about magnesium particularly which is used for photosynthesis – magnesium uptake increases at high pH but availability in the soil decreases).

But tap water is not the only thing affecting pH in the water in my bonsai soil. It’s also affected by the pH of my rainwater, which was 5.89 on the last measurementref, as well as the medium in my pots. I use composted bark, biochar and molar clay. Composted bark has organic components so is acidic, biochar is slightly alkaline and molar clay appears to be acidic – and this pH will become evident when particles of these components dissolve into the water. So the actual pH of the solution in my bonsai soil is anyone’s guess! All I can conclude from this is that a long summer without rain might cause my soil to increase in pH due to the removal of one acidic component – the rainwater.

The other thing to consider is that you can obviously adjust the availability of nutrients by adding them to your soil. So even if uptake is reduced by a particular pH, making more nutrients available could compensate for this. Hence the importance of regular fertilising for our bonsai, and using a range of different fertilisers which provide different nutrients.

Finally if you want to test the pH of your bonsai medium, a good approximation can be made by using a red cabbage and some distilled water (don’t use tap water, as this will affect the outcome if it’s not neutral to start with). Simply boil up a bit of red cabbage in (distilled) water, let it cool and while you are doing that put a representative piece of your bonsai medium into some water (also distilled). Allow them to soak for a while. Remove the cabbage from the cabbage water, strain the medium out of the bonsai medium water, and pour some of the cabbage water into the bonsai medium water. It should change colour according to the pH as follows (you can read more instructions here):

https://i0.wp.com/www.compoundchem.com/wp-content/uploads/2017/05/Making-a-Red-Cabbage-pH-Indicator.png?ssl=1

I performed this experiment on different bonsai mediums I had sitting around in my shed by soaking them in filtered water for 1 hour, then adding the cabbage indicator. The results were interesting! I was expecting the Kanuma to be acidic but it was actually neutral, as was my bonsai mix (which included some molar clay, bark, biochar, pumice and compost), and the pumice was surprisingly slightly alkaline. A rather small amount of biochar caused the indicator to go dark blue, which definitely tells me it needs to be used in moderation (although other mechanisms in biochar make nutrients available to plants, which you can read about in my biochar post).

What I conclude from all this is that my use of composted pine bark in my bonsai mix is probably a good thing as it will counteract the alkalinity from the tap water. This was a suggestion I learned from Harry Harrington’s website – although he recommends it for water retention, it would appear to balance a high pH medium or water as well. It also has the added benefit of being organic matter, which is a fertiliser in itself, creating more nutrient availability even if the calcium carbonate in my water locks some away. The need for applying fertiliser regularly is also apparent, as you just don’t know how nutrients are behaving in your particular bonsai soil and you need to give each tree every chance they have to access the nutrients they need. But overall other than causing annoying limescale marks on pots, my bonsai seem completely fine with hard water.

Mulch – relevant for bonsai?

If you’re a fan of Gardening Australia as I *massively* am, you will have noticed they are always going on about mulch. Mulch (often in the form of bark or woodchips) gets added religiously to everything they plant whether in a pot or in the ground. This got me wondering whether mulch could be beneficial for my bonsai.

What is mulch? Well back to my expert source Gardening Australia in their article Mulch, mulch, mulch, it is a layer of materials such as compost, bark and woodchip products, and/or various grades of pebbles and gravels which are placed on the soil. The benefits they claim for mulch include water retention, weed control, protection from extreme hot or cold, reducing erosion, delivering organic matter and nutrients into the soil, and even – that it looks good!

Actually I want all of these things for my bonsai, so what does the science say about the effects of mulch?

The main benefit most studies seem to agree on is that mulch reduces weeds, and the thicker the mulch the more weed reduction.ref In one study on container-grown Thuja plicata it was as effective as chemical weed control.ref This finding is repeated across many other studies as well.

How about reducing hot root temperatures? Potted tomatoes with grass mulch showed a direct relationship between mulch depth, soil moisture and soil temperature (see the chart below.ref Moisture was increased and temperature decreased with additional depth of grass mulch. I don’t think it’s realistic to add 10cm of mulch to a bonsai pot though!

In a winter study, chopped newspaper as well as other mulches moderated cold temperatures.ref The Thuja plicata study by contrast found no soil temperature improvement by using mulch, and they blamed the colour of the pots (black) for this.ref So it looks like there might be a positive effect on root temperature but not if you have black pots – and only if you put a decent amount of mulch on the soil.

What about water retention? A study using plastic mulch (ugh) on Japanese privet plants found that the water that needed to be applied was 92% less in mulched potsref but the Thuja plicata study stated that no change in water retention resulted. The researchers proposed that transpiration was the main driver of water use (and since this happens at the leaf surface mulch will not impact it).ref An intriguing study in South Africa found that only a mulch of white pebbles was useful for water retention in the hot summer, but mulches of other organic types (bark & leaves) were also effective at reducing evaporation during the colder winter period. They were pretty brutal with their research subjects – potted Polygala myrtifolia – which only got a watering once at the beginning of the trial and then had to tough it out for 6 weeks without any more water being added! In the summer period of the trial only 7% of survived, and 50% of these had white pebble mulch. During the winter trial 92% of plants survived and in these circumstances mulch of any kind provided a 20% improvement in soil water content relative to no mulch.ref So it looks like mulch provides some improvement in water soil content as long as it’s not a drought scenario (and you don’t have black plastic pots).

One thing I have noticed is that a layer of Melcourt propagating bark (2-7mm) on my bonsai seems to ‘suck’ the water into the pot in when I am watering. Several studies have found that a layer of mulch on soil increases water infiltration rates.ref1, ref2 This may be because the pieces of mulch are “able to absorb the kinetic energy of rainfall…[or watering]…and maintain soil aggregates longer” and result in “an increase in the tortuosity of water pathways due to the higher roughness”. A study on Holm oaks found that rock fragments were a good mulch for shallower root systems and improved soil moisture.ref A rough-textured mulch might be useful if water is bouncing off the surface of your planting medium.

So should you use some form of mulch on your bonsai? If you want weed control, probably. If you have trees which are particularly prone to drying out or succumbing to the elements – for example they have very shallow or small pots, or are potted in medium without some form of water retention (such as coconut coir, vermiculite, bark or sphagnum moss) it might be worthwhile. It may also act like a form of insulation (as discussed in the post on frost) to protect roots from the cold. Finally if your medium doesn’t want to cooperate with the watering can or hose, and water bounces or flows off it, mulch might be a way to reduce overflow and improve infiltration.

What options are there for bonsai mulch? There are quite a few different types of mulch described in this article but not all of these would be practical for a bonsai pot, and many you wouldn’t use for aesthetic or ‘aromatic’ reasons. Only a mulch with a relatively small component size would be feasible – this could include a small-sized bark mulch, or even a layer of smaller medium such as akadama, pumice or molar clay. I’d love to be able to use seaweed but I don’t think it would smell good, and it’s not that easy to find in suburban London. Organic mulches will break down over time and add organic matter to your soil – which you may or may not want to do. So – maybe this is a practice you might want to consider.

Nitrogen-fixing and bonsai

You’ve probably heard the term ‘nitrogen-fixing’ – it means extracting nitrogen from the air. Which doesn’t seem like it should be too difficult, since nitrogen makes up 78% of airref, but in reality plants can’t use gaseous nitrogen.

In nature (ie. where nitrogen is not added artificially as fertiliser) plants mostly rely on microorganisms to help them get nitrogen – they access it in dissolved inorganic forms as ammonium (NH4+) and nitrate (NO3-). This is the nitrogen cycle, where organic nitrogen from dead organic matter is converted back to inorganic nitrogen as ammonia (NH3), then ammonium, then nitrate.ref Although this is performed by a range of different bacteria and fungi, this is NOT nitrogen-fixing, it’s ammonification followed by nitrification.

Nitrogen-fixing is the specific act of extracting nitrogen from the air, and it’s also performed by a range of different bacteria, known as diazotrophic bacteria. Certain plants create symbiotic relationships with these bacteria, with the most effective being root nodule symbiosis. These plants have evolved to provide a safe home for nitrogen-fixing bacteria in their roots, in small nodules where the bacteria live. The bacteria get food from the plant and protection from the outside world, and in return the plant gets nitrogen. Plants which can do this all belong to the ‘FaFaCuRo’ group – Fabales, Fagales, Curcubitales, and Rosales – they are all flowering plants (angiosperms).ref You can download a database of all 825 known species with root symbiotic nitrogen fixation here – they include green manure such as clover and legumes, as well as some trees – Acacia (wattle), Casuarina (sheoak), Albizia (Persian silk tree), Robinia (locust), Wisteria, Alnus (alder), Elaeagnus (oleaster) and Hippophae (sea buckthorn).

The initial question behind this article was me wondering whether planting clover or similar nitrogen-fixing plants in my bonsai pots would achieve anything – like somehow supplying my tree with a free source of nitrogen. After looking into it further I concluded that the answer is no! Nitrogen-fixing plants have a great system – for themselves. The reason why they are used as green manure, or as rotational crops, is because they don’t require (or require less) supplemental nitrogen, so the land where they are planted gets a break from fertilizer. When they are harvested they can be ploughed back into the ground for bacteria to break down via ammonification/nitrification, so the next crop can benefit from a nitrogen source which hasn’t come from fertiliser. Basically it’s a way of making natural fertiliser – effectively compost – which hasn’t had added fertiliser as an input.

You could benefit from nitrogen-fixing plants such as clover for your bonsai practice – if you composted it and used it as organic matter in your soil mix. In fact it has been found that nitrogen-fixing trees in a tropical forest inhibit their neighbours (possibly due to their stronger growth rates), so you definitely don’t want your trees to share a pot with these species while they are alive.ref

There is also what’s known as ‘associative nitrogen fixation’ – this is when a nitrogen-fixing bacteria ‘associates’ with a species of plant without actually taking up home in root nodules. They are found on the roots, in the rhizosphere, and sometimes within plant tissues as endophytes.ref It has been suggested that up to 24% of nitrogen supply to cereal crops such as maize, rice and wheat is actually supplied in this way and that ‘mucilage’ (sugar exudates from roots) may be responsible for attracting the responsible bacteria.ref Although interestingly it may not actually be that the bacteria provide nitrogen directly, but instead they influence the plant to be able to access more nitrogen in the soil, for example by increasing root hair surface area.ref This is the mechanism by which biochar improves nutrient acquisition as well – by increasing the plant’s Nitrogen Use Efficiency or ‘NUE’.ref1,ref2

Which unfortunately brings us back to needing a source of nitrogen in the soil in the first place. What I have concluded is that unless a bonsai tree is a nitrogen-fixing species itself, the only way for it to obtain nitrogen is from the soil via the nitrification of dead organic matter, or by adding chemical fertiliser. And from a sustainability point of view, using at least some dead nitrogen-fixing organic matter (such as legume plants) for composting may be best as this is net-positive for nitrogen, bringing previously inaccessible air-borne nitrogen into the soil (so – go forth and compost your legumes!)

The main impact you can have as a bonsai tree custodian (aside from providing a nitrogen source) is to improve your tree’s nitrogen use efficiency so it can gain the most from the nitrogen which is present. There are a few ways to do this. Adding beneficial bacteria to the soil provides the associative nitrogen fixing effects explained above, and keeping the pot at the requisite temperature, pH, aeration and soil water level that is attractive to these microbes is also a factor – although it’s hard to know exactly what these conditions are! Avoiding extremes is probably the best approach. Adding biochar to the soil is known to improve nitrogen use efficiency.ref Encouraging a high root surface area through root pruning and encouraging root ramification is another contributor. Finally, do not overfertilise, as this has the opposite effect on root ramification since nutrients are easy to find and roots do not need to increase their surface area.ref