Rauh’s model represents the Cupressaceae family (cypress, juniper & redwood), some Araucariaceae, the Pinaceae family including most Pinus species, the Podocarpaceae family as well as angiosperms such as oak, maple and ash. It is a very common model for trees we encounter in bonsai.
The architecture according to Rauh’s model includes a monopodial trunk (one which continues to extend, and does not terminate) which grows rhythmically (on a seasonal cycle) and so develops tiers of branches, the branches themselves morphogenetically identical with the trunk (ie. they develop in the same way). Because the branches are identical, the trunk can be less dominant in this form and another stem can take over if the trunk is removed or damaged. Flowers and reproductive organs are always lateral and without effect on the growth of the shoot system.ref Often these are on short shoots.
An essential feature of Rauh’s model is that branches develop mainly by ‘prolepsis’, from dormant lateral buds close to the resting terminal bud.ref Prolepsis in this context means ‘the discontinuous development of a lateral from a terminal meristem to establish a branch, with some intervening period of rest of the lateral meristem’. So basically there is a gap or period of dormancy before the bud extends to form a branch. Whilst this might seem obvious to European readers, actually this mode of development is not what happens in other parts of the world, particularly the tropics, where continuous growth occurs, and this difference creates differences in the tree architectures visible in those different places.
It was noted in one study that Apple trees follow Rauh’s model during their juvenile phase but a different one during their reproductive phase (ie. their flowers terminate shoots and affect the branching after this point).ref
This architectural model is associated with many conifer families including Abies, Picea,Sequoia,Metasequoia, Cedrus, Taxodium, Taxus, Cephalotaxus, Ginkgo & Ilex aquifolium. The pattern for this architecture is a vertical, dominant trunk with rhythmic growth and which consequently produces regular tiers of branches at levels established by the growth of the trunk meristem. Branches are plagiotropic (horizontal) either by leaf arrangement or symmetry. The position of flowers/cones is not significant in the definition of the model (which means they don’t terminate the branches and have any effect on the structure).
One study in Indonesia looked at rainfall ‘stemflow’ and ‘throughfall’ (basically how much water runs off the tree into the ground causing erosion) and found that the Massart’s model tree (Pterocarpus indicus)had the highest leaf surface area and caused the least erosion from water runoff.ref However the study used angiosperms with broadleaves and not gymnosperms with needles.
Halle & Olderman in the 1970s created a model of 23 types of architectural models to which all tree species are believed to conform. They started with the idea that the shoot apical meristem/s (“SAM” – the primary growing tip) is/are the ‘treemakers’.ref The behaviour of the SAM over time determines the form of the tree. They identified four types of meristems (active growing shoots) which led to different forms – those with a single meristem (like a palm), those with modular construction which follow a precisely repeating pattern, trees with trunk/branch differentiation and those in which the meristem changes direction to produce both trunk and branch.ref These depended on factors like whether the SAM is reproductive or vegetative, whether it grows vertically or horizontally, whether growth of the SAM is continuous or rhythmic (ie. has a period of dormancy or a growth pause) and the chronology of growth of each meristem.ref
Below is an updated version which includes some models added later (and one which was removed as nobody found a real tree which conformed to the theoretical model).
https://gali-izard.arch.ethz.ch/francis-halle
Each architectural model has a unique combination of growth, branching, axis differentiation and position of sexual structures.ref Not all of these are relevant to bonsai – as you can see Holttum & Corner don’t branch and Tomlinson & Bell branch underground. Many of these models are relevant for palms, cycads and tropical trees which aren’t commonly used for bonsai.
Two of the architectural models represent many of the trees used in bonsai at least in the Northern Hemisphereref – Massart’s and Rauh’s model – their main difference is in the branching angle with Massart’s at an angle to the stem and Rauh’s growing upwards. In both models the trunk is monopodial – it keeps extending upwards and is dominant.
Massart’s ModelRauh’s Model
Massart’s model represents Abies, Picea, Sequoia, Metasequoia, Cedrus, Taxodium, Taxus, Cephalotaxus, Ginkgo & Ilex aquifolium. More forms and discussion of Massart’s model are represented in this post.
Rauh’s model covers the Cupressaceae family (cypress, juniper & redwood), some Araucariaceae, the Pinaceae family including most Pinus species, the Podocarpaceae family, as well as angiosperms such as oak, maple and ash. This is shown in more detail in this post.
If you’re looking to understand the architectural model for your particular tree, you might consult this book – it mainly focuses on tropical trees but gives some pointers on working it out.
Some other models include Attim’s model for Eucalyptus, this is similar to Rauh’s model but follows a continuous growth pattern – in these trees as one leaf expands outside the bud it is replaced by a new bud initiated at the shoot apex.
Troll’s model is applicable for hemlock, acacia, beech, where “axes are all plagiotropic (ie. horizontal), the architecture being build by their continual superposition; main-line axes contribute part trunk, part branch, the proximal part becoming erected, most often secondarily after leaf fall” – it is believed that reaction wood is involved in determining this architecture (the type of wood created to stabilise a branch against gravity – compression wood developed under the branch in the case of gymnosperms, and tension wood developed above the branch in the case of angiosperms). Hemlock is a gymnosperm with this model.
Troll’s Model
Finally, trees can move from one model to another when they move from their juvenile vegetative phase to their reproductive phase. For example Apple has been found to conform to Rauh’s model when juvenile but Scarrone’s when reproductive:ref
Angiosperms (flowering trees) are more predictable in terms of their buds, because in addition to the terminal bud/s, in most cases a bud is also developed below a leaf petiole (stalk), and when that leaf falls off, the new bud grows from that position, known as the leaf axil (hence it’s known as an axillary bud). Therefore the bud pattern is equivalent to the leaf pattern or phyllotaxy.
It’s important to understand whether your tree has compound leaves, which have multiple leaflets.ref These leaves only have one true petiole and at the base of this is where the lateral/axillary bud will form. No buds will form in the leaflet stems. See the below diagram.
Variables in the phyllotaxy include the number of leaves per node and whether they spiral around the stem or not. According to an article in Natureref, at the shoot tip itself, the ‘golden angle’ is observed between leaves: 137.5° – in the article the researcher finds that this angle minimises the energetic investment of creating divergent leaf positions (in the creation of vascular tissue to supply the leaves). After the stem elongates, leaves start to spiral according to the Fibonnaci rule, whereby common leaf spiral angles are 1/2, 1/3, 2/5, 3/8 and 5/13. For example a 3/8 would mean the angle between leaves is 3/8 of 360o, or 135o. This means it takes 8 spirals before a leaf is in the same position on the stem (although now vertically separated).
As can be seen above with only one leaf per node the arrangement simply spirals at different angles. With more than one leaf per node a similar principle applies but each pattern spirals (eg. both leaves in a two leaf per node spiral at the same angle). Multiple leaves at the same node is also called a whorl (common in gymnosperms).
So you should be able to predict where buds will develop on your angiosperm trees by simply looking at the leaf arrangement, and if it’s winter and your tree is deciduous, by the branch arrangement. What these buds will turn out to be – short shoots with flowers, vegetative shoots or flowers, is not as easy to understand but some pointers are here: Bud types – reproductive & vegetative.
The reproductive system and organs of plants are extremely varied and complex, and worthy of an entire website to themselves – a comprehensive view is beyond the scope of this website. But what I want to do is provide a bit of information to help you identify which buds might be reproductive vs vegetative.
There are different buds for vegetative (shoots & leaves) and reproductive (flowers, strobili) organs – within each bud a different set of components develop depending on what kind of bud it is. For angiosperms, it’s hypothesised that flower buds are based on the same structures as vegetative buds – that is, a bud starts as vegetative and then differentiates into a flower bud.ref For gymnosperms, reproductive buds contain male or female strobili.ref These are the male pollen cones or the female seed cones.
There are two ways to work out which bud is which – by their appearance or by their position on the tree. The appearance route is best aided by dissecting some actual buds from the tree you are interested in, so you have real data from the real tree. Otherwise, read on for more information about how vegetative and flower buds differ in appearance.
Vegetative buds are “encased by strong, coarse, mature scale leaves. Thinner, more membranous scale leaves make up the next layer. The scale leaves form a protective enclosure surrounding the developing foliage leaves.”ref In many of the articles online, leaf buds are said to be thinner than flower buds (at least for angiosperms). Below are the vegetative buds of Acer pseudoplatanus and Fraxinus excelsiorref:
A flower bud develops sepals, petals, stamen, pistil, ovaries & anthers, instead of leaves and more buds. Below is a scanning electron micrograph of a Bing cherry flower bud forming where M is the meristem, B is the bract and F is the very start of the flower forming – the progression over time is from left to right. On the right is the pistil with ovary (O) style (SY) and stigma (SM). The scale of the image is provided by the white bar on the bottom right hand side, which is 100 micrometres (or microns) – about 1/100th of a centimetre. Obviously it’s impossible to detect a flower bud at this stage by eye, it’s way too small!
The buds of these Bing cherries started forming and were detectable under a microscope from mid-May (the location was Washington state USA) – the year before they would flower and fruit. At a lower magnification below is a progression in flower bud development of a Camellia – the key difference is that at A2 when the flower starts to differentiate, the tip of the bud becomes more rounded and flattens.
Some of the trees we use in bonsai are dioecious which means they are only male or female and not bothref. This means they will produce only one type of flower or strobili bud. To check whether your gymnosperm is dioecious or monoecious you can check the gymnosperm database. Unfortunately I don’t have a reference link for angiosperms.
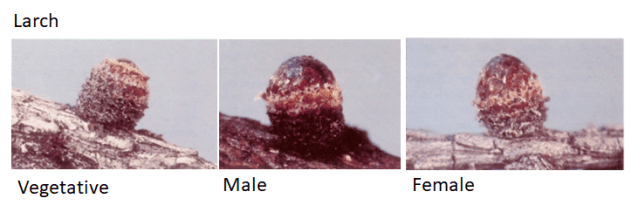
In gymnosperms there are no flowers, instead the reproductive organs are male or female strobili (pollen or seed cones respectively). A brilliant reference for some of these is available online here. An extract from the publication is provided below with some examples of vegetative and male & female strobili buds.
As noted another way to determine the type of bud is by its position. To do this you need to work out what the architecture of your tree is and where buds of different types typically form. Trees conform to one of 24 architectures as described in Tree Architectural Models and these give an indication to the location of reproductive buds. Trees can have one model for their juvenile phase (before they flower or adopt mature foliage) and then one for their reproductive phase.
In the case of apple, it has been found to conform to Rauh’s model when juvenile and Scarrone’s when reproductive.ref Even with this, “great differences exist between cultivars whether they belong to “spur” vs. “spreading” or “terminal bearing” growth habit”ref
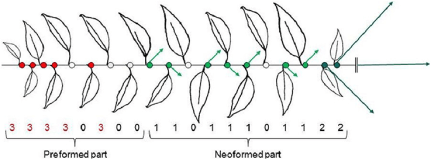
In cherry, “The long branches bear short shoots, also called spurs, in lateral positions on the distal half or two thirds of the branch with more vigorous spurs toward the distal part [the most distant part]. Flowering occurs in axillary positions on the five to six basal-most nodes of all shoots whether long or short. Floral buds are thus located exclusively on the preformed nodes of the previous year shoots.”ref
Red dots are flower buds, formed the previous year, and green dots are vegetative buds, formed during the growing season https://www.frontiersin.org/files/Articles/105157/fpls-05-00666-r2/image_m/fpls-05-00666-g001.jpg
In some species, particularly pines, the long shoot buds have many different components on them in a specific order. Here is a Pinus contorta bud – you can see the male (pollen) cones appear first, and are positioned at the bottom of the final shoot, and the female (seed) cones appear last just below the top of the shoot.
As you can tell from the above, there is quite a bit of complexity in understanding the architectural model of a tree, and where different buds form, as there are many variables involved. Observation is probably going to be the better method.
Most bonsai trees progress through stages of development, each with a different objective. In general the progression is thicken trunk -> achieve branch & root structure -> achieve branch, foliage & root ramification -> reduce leaf size -> evolve as branches grow/fall off. The faster we can move through the first few development stages, the faster we will have beautiful, well-proportioned bonsai – harnessing the tree’s natural growth is a way to speed this up. We also want to avoid doing things which slow down a tree’s growth during these phases, as this will mean it takes longer to get the tree we want. Read about how trees grow before starting at #1 below. Also consider what do old trees look like?
1. Trunk
Some bonsai enthusiasts collect mature trees for bonsai specifically so they can start with a thick trunk, following a collection process which minimises damage to the tree. The alternative is growing your tree’s trunk. Once a tree has its roots and foliage reduced in size in a bonsai pot, it won’t generate the energy needed to make significant sapwood additions and its girth will only increase by small increments every year. So you really need to be happy with the trunk size first before you stick it in a tiny pot. But – how big should a bonsai tree’s trunk be?
2A. Branch Structure & Overall Shape
Arranging the branches is what gives you the canopy and overall foliage shape that you’re after and the first step in this process is growing (or developing) the branches you want in the positions they are needed. Growing a branch starts with a new bud, which, unless it’s a flower bud, becomes an extending shoot and eventually a new branch. So firstly you need to work out where new buds will grow on your tree and then deal with the extending shoots as needed to get the required internode length.
You may need to remove some buds and shoots if they don’t help achieve the shape you are looking for – this should be done as soon as possible to avoid wasting the tree’s finite energy reserves. You have a trade-off to make here because leaving more foliage on the tree will provide more energy overall which contributes to its health and ability to recover from interference. However, growing areas of the tree which won’t be part of the future design is a waste of energy. You don’t want to remove so much of the tree’s foliage that it struggles to stay alive or develop the areas that you do want to grow out.
When you are creating your branch structure, often you will need to reposition branches – this is done with a wide range of different tools and techniques. A more advanced technique for adding new branch structure is grafting.
Sometimes the trunk itself or larger branches need a rework, to make them more interesting or to make them look more like old trees – for example adding deadwood or hollowing out the trunk. Usually this is achieved through carving.
2B. Creating a Strong Root System
The trunk thickening and branch structure phases both work best when the tree has lots of energy and so letting it grow in the ground or in a decent sized pot during these phases will get you there quickest. This also allows the roots to keep growing, but you want to understand about the role of roots, and root structure & architecture even if you still have your bonsai in a training pot. Particularly in this case, knowing about how to foster the the rhizosphere will help your tree stay vigorous. To maximise the roots’ exposure to nutrients and water you want to encourage Ramification of Roots (lateral root development).
Eventually it’s time to move the tree into a bonsai pot. This requires cutting back the roots, but as long as the roots are balanced with the foliage in terms of biomass, the tree should be OK. Root growth is usually prioritised outside of times of stem/foliage growth, and above 6-9 degrees C. So repotting might be best conducted at times that meet this criteria. Your growing substrate/medium is an important consideration.
3. Ramifying Branches & Foliage
Ramification is when branches subdivide and branch, giving the impression of age and a full canopy – and a well-ramified tree is a bonsai enthusiast’s goal. There are some techniques for increasing the ramification of branches and foliage. But not as many as there are for root ramification.
This stage also involves ongoing branch selection and reshaping (see 2A above). Another consideration is whether to keep or remove flower buds.
4. Reducing Leaf Size
An end stage in the journey to bonsai perfection is leaf size reduction. In nature, leaf sizes reduce relative to the biomass of the tree as it ages but since bonsai are small this effect doesn’t translate since the biomass never gets large enough. The tried and tested method for reducing deciduous tree leaf size is actually to practice one of the various methods of defoliation. A couple of others are covered here in reducing leaf size.
When to conduct these various activities depends on when the tree can best recover from them – which is a function of the Tree Phenology (or Seasonal Cycles).
5. Evolving Branches
Trees are not static organisms – they obviously continue to grow which is what we harness in the above steps. Part of this is that eventually branches may become too large for the design, or they may fall off (Peter Warren notes that Mulberry are known for this). As bonsai artists we want to have this in mind so that branches are being developed which can take their place in the future. This is an ongoing version of step 2A.
Life on earth is classified into different categories and the process of doing this is the science of taxonomy. There is a lot of interesting history associated with biological taxonomy but my goal with this post is to show where trees fit into the taxonomy of life. Plant taxonomy is governed by the International Code of Nomenclature for algae, fungi and plants. They define the ranking of taxonomy as kingdom, division or phylum, class, order, family, genus, and species.
https://en.wikipedia.org/wiki/Taxonomy_(biology)
As of 2015 there are seven kingdoms – Animalia, Plantae, Fungi, Bacteria, Chromista, Protozoa and Archaearef – viruses aren’t considered living so they have their own separate grouping.
Trees fall into the kingdom Plantae, which comprises “all organisms possessing plastids with double envelopes that are free in the cytoplasm”.ref Which must be one of the most brain-exploding definitions of plants you will ever read! What it means is that members of the kingdom Plantae are dependent on chloroplasts, organelles with the green pigment chlorophyll, which can photosynthesise, AND these chloroplasts have specific morphology and location. The reason there is this qualifier is because the kingdom Chlorista, which includes some algae, also has chloroplasts, although they are different to those in Plantae.
Anyway even though ‘tree is only a way of being a plant‘, it’s not as far as we know a way of being a chlorista, so we will focus on Plantae for this post.
(Bear with me on this next bit – to drill down yourself you can refer to this site). Plantae is broken into 8 phylla, one of which is Tracheophytaref(plants which have a vascular system); within Tracheophyta are 8 classes, including:
Cycadopsida includes cycads & palms (not so relevant for bonsai)
Ginkgoopsida includes only one member – the ginkgo
Gnetopsida includes nothing we care about from a bonsai point of view (Gnetum, Welwitschia, and Ephedra)
Liliopsida – also known as the monocots, includes lillies & bamboo (not bonsai relevant unless you’re into bamboo)
Lycopodiopsida – club mosses (not for bonsai)
Magnoliopsida – also called the dicots or angiosperms – includes all the flowering plants, including many trees we use for bonsai
Pinopsida – also known as conifers, again, a favourite of bonsai enthusiasts.
Polypodyopsida – leptosporangiate ferns (maybe an accent plant, but not a bonsai)
Angiosperms evolved a lot later than gymnosperms – their last living ancestor was no earlier than 140–250 million years ago, whereas their joint ancestor with gymnosperms was 310–350 million years ago.ref They evolved to produce flowers which could be pollinated by insectsref, and to have lower reproductive costs overallref, making angiosperms the most successful plant family today. There are 444k angiosperm species entries in the Global Biodiversity Information Facility databaseref, which constitutes 74% of the total species in the database. You can see them all here.
Pinophytes are a bit easier to get your head around as the only surviving order within it is Pinales. Pinales contains all the conifers in six families (along with some extinct families and species which I haven’t listed):
Araucariaceae (including monkey puzzles and the Wollemi pine)
Podocarpaceae (mainly southern hemisphere evergreens including Buddhist Pine) and Phyllocladaceae (celery pines)
Sciadopityaceae (Japanese umbrella pine is the only member in this family)
Taxaceae (yews) including Cephalotaxaceae (plum yew)
Here’s a useful chart which was created on genetic analysis of 64 protein-coding genes to determine the position of dawn redwood relative to other conifers (you can see it there in the Cupressaceae family) :
Quite often trees are moved from one classification to another, specially once their DNA has been sequenced and this has been very much the case in angiosperms – an updated classification is created by the Angiosperm Phylogeny Group every few years. Here is a summary of the most recent changes made in 2016.
One piece of advice often given to bonsai enthusiasts is that root pruning should be avoided until bud break – usually the advice says you should wait until the buds are just about to burst and then you can repot to your heart’s content. But is there any scientific basis to this? The rationale for the advice is the belief that trees store energy for bud burst in their roots, which translocates prior to bud burst and is used to power bud swelling and opening.
Below is a chart showing non-structural root carbohydrate levels through the year for Prunus avium – these include sucrose, glucose, fructose, sorbitol, raffinose & inositol. FB indicates when the tree was in full bloom, and H was the fruit harvest. As can be seen, the root carbohydrates don’t deplete until after bloom has happened (this species flowers before leafing out) and then builds up again after leafing, is depleted at fruiting and then builds up again. So in this case the tree has used the majority of root carbohydrates after blooming, and they were built back up again once the leaves were out.
Labelling studies use radioisotopes to track where carbon has moved over a period of time. These have shown evidence that carbohydrates from roots are translocated to the first formed leaves and flowers in apple, cherry, pecan & grape.ref This study also confirms that “In broadleaf deciduous trees, non-structural carbohydrates are depleted during winter dormancy and at the onset of spring growth, then replenished during the growing season”, however “in evergreen conifers non-structural carbohydrates accumulate in the crown in late winter and gradually decrease during the growing season”.ref In evergreen angiosperms (Eucalyptus in this case) it was found that root carbohydrates did vary somewhat between a peak in summer and a minimum in spring, with starch being the major storage molecule – not only that, the researchers also found a lot more starch in the roots than in the lignotuber which is commonly believed to be some kind of storage organ (but apparently isn’t).ref
So in general it is correct that trees are using their root-stored carbohydrates to flower and leaf out – although it would appear that they use these for actual leafing and not just to get to the bud stage. So theoretically it may be better if you are doing a major root prune to do this once the leaves are out (taking care not to remove so many roots that the leaves can no longer access the water they need).
Another study looked at the age of sugars in the woody and fine roots of different tree species. They found a big difference between those of ring-porous vs diffuse-porous trees – remember that ring-porous trees have a smaller and more defined ring of conducting xylem – and in some of these trees the xylem completely seizes up during the winter and a new conducting layer is grown every year. In the chart below ring-porous trees are on the left and diffuse-porous (which includes all conifers) on the right.
In both types of trees, the youngest sugars are in the smallest coarse roots, suggesting these are being used as a sugar supply within a season. The sugars in the larger roots are aging with the tree, suggesting that the tree has obtained enough carbohydrates by other means (from photosynthesis or other storage tissues such stemwood) and hasn’t needed to tap the coarse root food storage.
The obvious difference between the two is that ring porous trees have younger sugars in their fine roots as well. It looks like ring-porous trees, which probably have a higher energy requirement since they need to regrow conducting xylem as well as buds & leaves, are tapping the fine roots for energy as well as the small coarse roots. Diffuse porous trees on the other hand do not appear to be using fine roots for this purpose.
But how much are roots contributing relative to other storage tissues in the tree? One study looked at a range of different trees in Harvard Forest near Harvard University in Massachusetts in the USA.ref See below for the data showing the change in total non-structural carbohydrates throughout the year starting at January and going through to December for five species. What’s obvious is that root storage plays a different role depending on the species – and is least important in the white pine.
What’s also interesting is that the only gymnosperm in the study (white pine), has a different peak – in June (midsummer when the sun is highest in the northern hemisphere). The other species peak in October after a season of photosynthesising.
Why do we care about this as bonsai enthusiasts? Well, stored energy helps to power processes within the tree, so whenever we prune storage tissues such as branches, stem & roots, we are removing energy reserves. So ideally we’d prune these when stores are lowest. When this is depends on the species but the above chart would indicate that actually August is a good time to remove roots – which goes against the advice often provided. Using the same chart would suggest that April pruning is best for branches. Which maybe suggests that bud break is being driven more by branch stored carbohydrates than root stored carbohydrates.
The problem with research into the natural world is that there are so many variables, it’s hard to disentangle them. One way that researchers reduce variables is to use a ‘model organism’. A model organism is one that is commonly used for research and then once the behaviour is studied in that organism then variations are looked at in others. For example the fruit fly Drosophila melanogaster is used for insect research.
For plant biology, the model organism tends to be Arabidopsis thaliana, which is a small flowering annual weed and a member of the mustard (Brassicaceae) family.ref Many many studies of plants are conducted on this species. The eagle-eyed among you will have noticed it’s a flowering plant – that is, an angiosperm. So findings from this model plant don’t necessarily represent conifers. Just something to keep in mind when reading plant research.
Lateral roots are ones which branch off from the main root – just like lateral or axillary buds aboveground. Lateral root development is how roots branch and ramify – similarly to stems, which ramify through bud initiation and stem growth. Encouraging strong lateral root development is a goal in bonsai, because we want to create lots of fine root mass to provide maximum exposure to water, nutrients and enabling symbiotic partners (fungi & bacteria); it also helps to stabilise the tree in the pot.
The below image is a nice one illustrating the development of lateral roots. The root grows from the tip – known as the root apical meristem (RAM), where new cells are created and the root tip is constantly extending. Above the apical meristem are pericycle cells which are preparing to initiate lateral roots, and above that these have been initiated and are starting to grow. At the top a lateral root emerges. The pale beige section in the centre labelled the ‘central cylinder’ is the location of the vascular bundle containing xylem and phloem.
https://images.app.goo.gl/E112RndafnE5jdNz5
I have been astonished while researching this post to discover just how many things can affect lateral root growth. My post on Ramification of Branches and Foliage had just three ways to improve ramification – dividing the apical meristem, pruning (in various ways) and applying cytokinins. In this post there are no less than nineteen different mechanism for encouraging root ramification! I’ll list them (x) as I go.
Before we look at each one of these, let me tell you about the ‘root clock’. The root clock is an oscillating cycle in roots which determines where lateral roots are formed – the spacing between them is dependent on the cycle time of the clock.ref The way this works is through the oscillating expression of genes in a region close to the tip of the primary root, called the oscillation zone.
As with anything growth-related, our friends the plant growth regulators (along with genes) are involved. Auxin (1) promotes the development of branching lateral roots as well as adventitious roots (such as on air layers) whereas cytokinin (2) opposes these effects.ref The formation of lateral roots involves both shoot- and root-derived auxin with the root tip responsible for lateral root initiation (the first step of creating a new root), and auxin from the shoot responsible for lateral root emergence (the elongation and growth of the initiated root).ref The root clock is involved here because the back and forth gene expression causes programmed cell death at the root tip to happen periodically, which releases auxins back up the root and initiates a lateral root.
Ethylene (3) inhibits root growth, and brassinosteroid (4) and abscisic acid (ABA – some species only and in small amounts (5)) stimulate lateral root growth and elongation.ref1ref2 In fact there are complicated interactions between genes and plant growth regulators when it comes to roots with different hormone levels detected in different parts of the root, based on the differing roles they are playing in each stage of root growth. For more check out this article about tap roots which has a good diagram showing plant growth regulators (fig 2).
Other substances produced within plants which promote lateral root development include salicylic acid (6) and melatonin (7).ref
Aside from plant hormones, the nutrients in the soil also affect the level of lateral root development – for example nitrogen (8): “in low-nitrate soils, patches of high nitrate have a localized stimulatory effect on lateral root development in many species, however where nitrate levels are globally high (i.e. not growth limiting), lateral growth is inhibited”ref A phosphorus (9) deficit “favours a redistribution of growth from the primary roots to lateral roots”.ref A sulphur (10) defiency “leads to the development of a prolific root system, usually at the expense of shoot growth…roots elongate faster than those with sufficient sulphate, with lateral roots developing earlier, closer to the root tip and at a greater density.”ref
Lateral root formation is restricted when water availability is low (11), and somewhat surprisingly, when there is a lot of salt (12) in the soil more lateral roots form.ref
You might not think that roots need light (13), but in fact light above ground is necessary for maintaining the oscillating signal of the root clock and for the formation of sites where lateral roots can branch off; an absence of light has a strong inhibiting effect on root elongation and branching.ref This may be related to the point below about sucrose – light drives photosynthesis and the creation of photosynthates like sucrose.ref
This intriguing study found that drenching roots in sucrose solution (14) “significantly increased lateral root branching and root formation compared with non-sugar supplemented controls.”ref This may be because of effects on the rhizosphere vs the roots themselves. Just beware what you might attract if doing this in your bonsai garden as a sucrose drench sounds like an insect’s dream come true.
Several studies have determined that root pruning (15) encourages lateral root formation ref1, ref2 and that this happens most likely due to a surge in auxins after the root is cut. Similarly, synthetic auxins applied to roots of scarlet oak resulted in six times the number of adventitious roots compared to a control, and resulted in longer roots as well.ref
Another way to increase lateral root formation is via encouraging arbuscular mycorrhizal fungi (16). Interestingly, the mechanism for this is that the plant root detects the presence of chitin in the fungi cell walls.ref Chitin (C8H13O5N) is “the most abundant aminopolysaccharide polymer occurring in nature, and is the building material that gives strength to the exoskeletons of crustaceans, insects, and the cell walls of fungi.”refResearchers found that any source of chitin (17) had the same effect – including chitin derived from shrimp shellsref Chitins can be found in many living creatures, including crustacean shells, insect shells (beetles, grasshoppers, cockroaches, blowflies), bat guano, resting eggs of Daphnia species, spiders, green algae, zooplankton (krill), phytoplankton and fungi.ref1ref2ref3
On a similar theme (and maybe a repeat of 14) the presence of Pseudomonads bacteria has been shown to increase adventitious root development in tobacco.ref
While reading a study about plant growth substances recently I came across (18) – apparently you can physically bisect a root apical meristem and it will become two autonomous RAMs.ref
And lastly let’s look at two types of pots which affect root ramification: (19) if you use a white pot instead of a black, green or other dark colour, roots will be up to 2.5 times denserref, and if you use an air pot (20) they will have fewer circling or malformed roots but also less root mass overall.ref
So let’s summarise all the different ways you can practically encourage root ramification in your bonsai:
Root pruning
Encourage auxin & sucrose production via photosynthesis (leave some leaves and give the tree good light)
Apply exogenous (from outside the plant) auxins – for example from compost or compost leachate
Drench roots in sucrose solution
Add and nurture mycorrhizal fungi and friendly bacteria
Add a source of chitin (as a vegetarian I can’t recommend any of the animal sources, but some other ideas include scooping the algae from your garden pond (or similar) or adding some mushrooms to your compost and adding that (or its leachate) to your pots
Bisect the root apical meristems (ie. cut them down the centre with a clean sharp blade)